Version française


? | Home page | Tutorial | Mixing in practice | Drums

Homepage
Home page


DRUMS

Reminder: we work on this song I wrote: Life


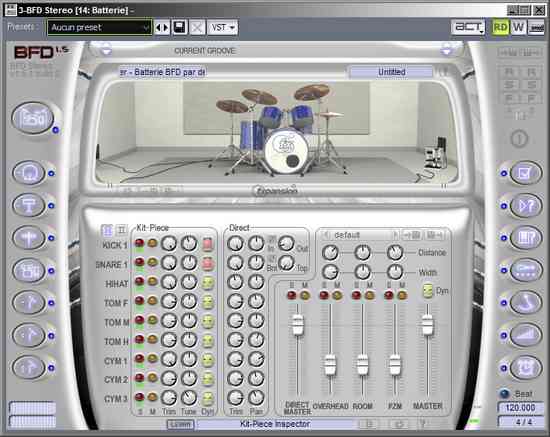
For this song, I used a virtual drums software called FXpansion BFD 1.5, which is rather old but still sounds good. It uses real drum samples (kicks, snares, toms, cymbals) and sounds realistic. Many settings are available and allow you to change the way your drums will sound (drum head tension, microphone positioning...). Since then, I upgraded to BFD 3, but I was still a BFD 1.5 user when I composed this song.
FXpansion - BFD 1.5
Life uses the following drum elements:
        * Kick drum
        * A rimshot snare drum sound during the quieter parts
        * A normal snare drum hit sound for louder parts
        * A hi-hat and a few crash and ride cymbal hits
I didn't use any splash cymbal or toms in the song.

Routing

The drums are routed as follows:

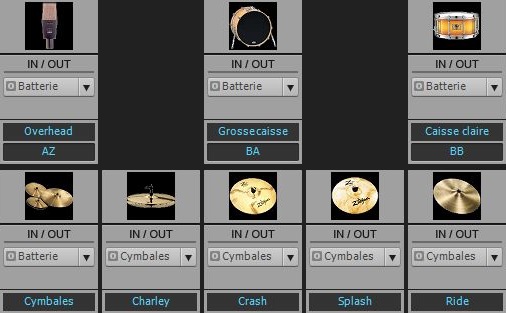
MIDI AND AUDIO DRUM TRACKS
Life - MIDI drums track
The MIDI track contains the drum score itself. It is linked to the audio tracks of each drum element.
Each one of the audio tracks is routed to the corresponding bus (snare drum track routed to snare drum bus, etc.)
Life - Drums buses
Bus KICK DRUM
Bus SNARE DRUM
Bus CYMBALS (hi-hat, crash, splash, ride)
Bus OVERHEAD
DRUMS bus

Top of page

KICK DRUM


This is the sound of the kick drum before processing


"Kick drum" bus

On this bus, I put a parametric equalizer plugin called "TrackPlug" from Wave Arts.

This is the sound I get after applying the TrackPlug plugin


Source: kick drum audio track
Target: Drums bus
Volume: -7.5 dB
Panning: 2% left

Kick drums are usually located at the center of the stereo field. I put it slightly to the left, by 2%, so that it leaves way to the vocals in the center, even though vocals and kick drum frequencies are unlikely to interfere. You will also see that I put the snare drum slightly to the right, by 2%, for the same reason. Kick drum and snare drum are thus slightly separated, although it isn't that obvious when listening to it.
TrackPlug plugin
TrackPlug plugin

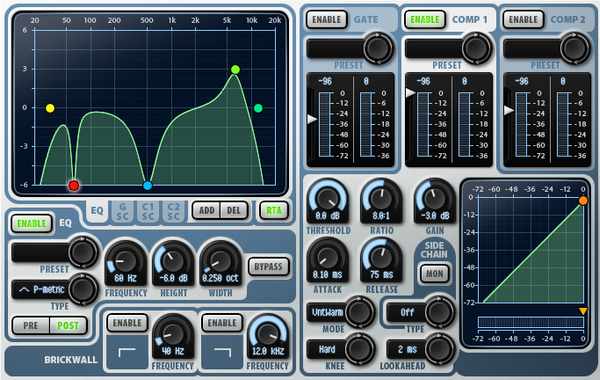
To obtain this kick drum sound, I used the following settings:

     - A high-pass filter at 30 Hz (yellow dot): below this value, frequencies become useless. On the one hand, few audio devices are able to reproduce them, they are not very musical and like all low frequencies, they demand a lot of energy to be rendered correctly, and that is to the detriment of other frequencies. So I cut them, and I did not want a song heavily loaded in low frequencies.

     - A 60 Hz band, set at -6 dB and a width of 0.25 octave (red dot). This dip frees some room for the "Saw bass" low synth, for which I boosted this particular frequency by 2 dB (see here). The low tone of the synth is thus more audible, and the kick drum sound is not affected too much.

     - A 500 Hz band, set at -6 dB and a width of 1 octave (blue dot). This dip reinforces the kick drum "boom" and suppresses some unpleasant tones. This also leaves some room for low vocal frequencies.

     - A 6.12 KHz, set at +3 dB and a width of 1 octave (green dot). Raising this frequency adds some "slamming" to the kick sound.

     - A low-pass filter at 11 KHz (turquoise dot): There was no sound beyond this frequency, so I added this filter to cut any parasite sound that would not add anything good to the kick drum sound, and could even conflict with the cymbals in the high frequencies.

     - Compressing part of the plugin: threshold set at 0 dB, ratio of 8:1 and gain set at -3 dB. The attack time is very short with a value of 0.10 ms (that will make the hit less powerful than it originally was) and the release time is set to 75 ms.

     - In the end, the EQ and the compression result in a very dry sound, a bit thinner than the sound before treatment, with a slightly lower volume due to the negative compression gain. I did not want a huge, invasive kick drum sound. Mastering plugins will later bring some thickness to it.
Top of page

SNARE DRUM


This is the snare drum sound before processing
First, the rimshot sound, then the normal hit sound


"Snare drum" bus

On this bus, I put a parametric equalizer plugin called "TrackPlug", as well as a limiter plugin called "FinalPlug", both from Wave Arts. The order in which you place the plugins matters. Here, The EQ comes first to shape the sound, then the limiter will boost the equalized signal.

This is the sound after processing with the TrackPlug and FinalPlug plugins
First the rimshot sound, then the hit sound


Source: snare drum audio track
Target: Drums bus
Volume : 0 dB
Panning: 2% right

The snare drum is usually located in the center of the stereo field. I put it slightly to the right, by 2%, so that it leaves room for the vocals. I also deported the kick drum 2% to the left. Thus, kick drum and snare drum are separated a bit, while remaining mostly centered.
TrackPlug plugin
TrackPlug plugin

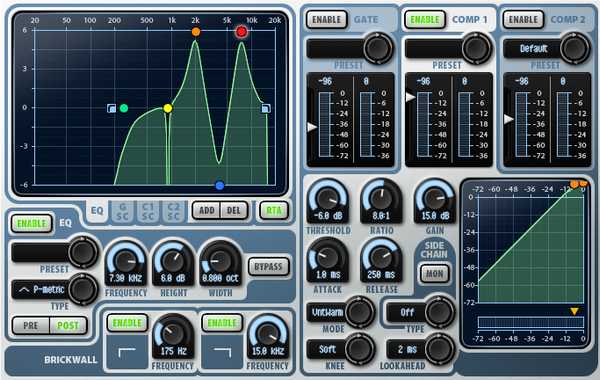
These are the settings I used with the TrackPlug plugin on the snare drum:

     - A brickwall at 175 Hz in order to cut all frequencies below this value. This makes sure that no snare drum frequency will interfere with the low synths, the bass or the kick drum. It's a bit redundant because I also us high-pass filter as described below, but let's call it a double security measure.

     - A high-pass filter at 2500 Hz (green dot): lower frequencies start declining at 2500 Hz and decrease more and more below this value.

     - A "notch" 880 Hz band. This type of band completely suppresses the sound in the target frequency. I used this on a width of only 0.1 octave because it was generating an unpleasant sound. Maybe because of the drum sample used? Anyway, suppressing this precise frequency solved the problem without affecting my snare drum sound.

     - A 1.97 KHz, set at +6 dB and a width of 0.8 octave (orange dot). This adds a little smack to the snare drum sample I chose.

     - A 3.88 KHz, set at -6 dB and a width of 0.8 octave (blue dot). Decreasing this frequency does make the snare drum sound somewhat thinner if you listen to it soloed, but it makes the sound more dry and prevents from encroaching upon guitar or vocals frequency ranges. Once drowned in the mix, decreasing this frequency isn't really audible.

     - A 7.3 KHz band, set at +6 dB and a width of 0.8 octave (red dot). Boosting this frequency boosts the brightness and clarity of the snare drum, and helps standing out in the mix.

     - Another brickwall at 15 KHz to suppress all very high useless frequencies.

     - The compressor part of the plugin has a threshold set at -6 dB, a ratio of 8:1 and an important gain, around +15 dB. The attack is set to a fast 1 ms and a slow decrease of 250 ms.

     - Like the kick drum, the EQ and the compression make the snare drum sound very dry, somewhat high-pitched, and it stands out easily in the mix. The Mastering stage will boost a bit further.
FinalPlug plugin
FinalPlug plugin

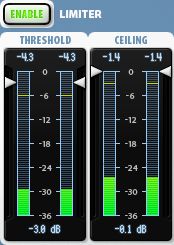
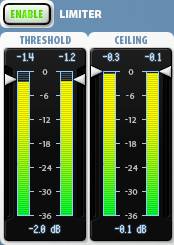
These are the settings used with the plugin FinalPlug for the snare drum:

Final Plug is a commercial plugin, you will find free limiters here, as well as a compressor (that can also be used as a limiter with the appropriate settings).
A limiter will boost the sound by defining a bottom volume from which the sound will be raised up to the maximum ceiling value

     - Threshold set at -3 dB. This is a rather small compression amount, just enough to boost the sound a bit, without having to edit the bus volume itself.

     - Ceiling: set at 0.1 dB. The plugin will limit the bus volume just before reaching the maximum.


Top of page

CYMBALS

The buses of the hi-hat, the crash and the ride cymbal are all routed to the "cymbals" bus.
This is the sound of the cymbals before processing

Hi-hat


Crash


Ride


"Cymbals" bus

Each of the buses for the hi-hat, the crash cymbal and the ride cymbal include an EQ plugin, the Trackplug plugin from Wave Arts, and the Cymbals bus includes a limiter plugin, the FinalPlug from Wave Arts. So the 3 cymbals are EQed on their respective bus, before their signal is sent to the main Cymbals bus.

Source: audio tracks from the Hi-hat, the Crash cymbal and the Ride cymbal
Target: the buses of the Hi-hat, the Crash and Ride Cymbal are routed to the Cymbals bus, which in turn is routed to the Drums bus
Volume: 0 dB (Hi-hat, Crash and Ride buses), -3 dB (Cymbals bus)
Panning: 35% right (Hi-hat), 25% right (Crash), 35% left (Ride), 0% (Cymbals bus)

The stereo placement of the cymbals isn't always the same as the one I chose. You could enlarge the stereo panning by putting the Hi-hat more to the right (90 or 100% for instance), and the ride on the opposite side. Or you could on the contrary narrow the stereo panning by putting the elements closer to the center. You may also invert the panning by placing the Hi-hat on the left and the ride on the right. The audience in a concert sees the Hi-hat on their right side, whereas it is located on the left from the drummer's point of view. Also the elements are located all around the drummer from his point of view, but from the audience's point of view, the sound of the whole drumkit seems to be coming from one point in space. So depending on which point of view you wish to refer to, you may pan the element in very different positions.
Plugin TrackPlug Charley
Hi-hat TrackPlug plugin

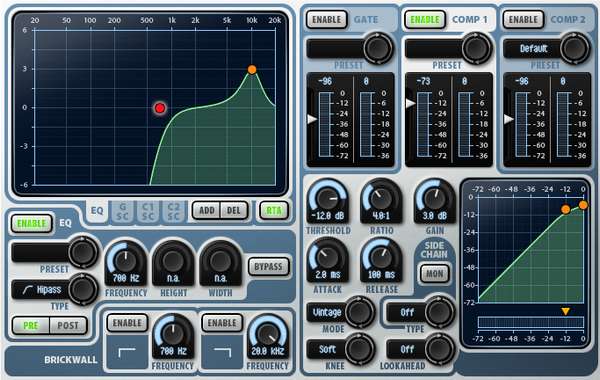
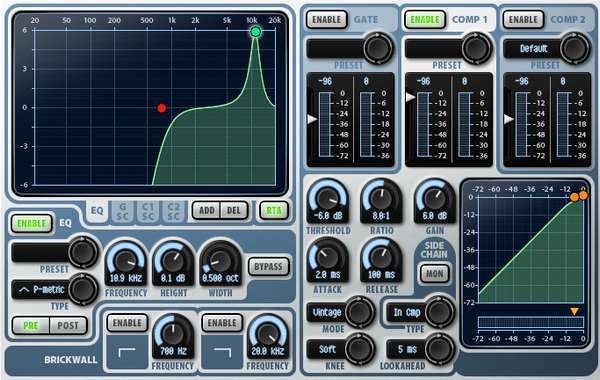
Settings for the TrackPlug plugin on the Hi-hat bus:

This is the sound obtained after processing with the TrackPlug plugin ("hi-hat", "Crash" and "Ride" buses) and the FinalPlug plugin ("Cymbals" bus)

Hi-hat

     - A high-pass filter at 750 Hz (red dot): the lower frequencies are useless with a Hi-hat, as it's merely producing a high-pitched sound, like all cymbals.

     - a band at 10.9 KHz, with a volume of +6 dB and a width of 0.5 octave (green dot). After scanning the frequencies, I found this one was the best choice for the Hi-hat in my opinion.

     - The compressor part of the plugin is set with a threshold at -6 dB, an 8:1 ratio and a gain level of 6 dB. The attack is very short with 2 ms and the release value is 100 ms.

Plugin TrackPlug Crash
Crash TrackPlug plugin

These are the settings of the TrackPlug plugin on the Crash bus:

This is the sound obtained after processing with the TrackPlug plugin ("Hi-hat", "Crash" and "Ride" buses) and the FinalPlug plugin ("Cymbals" bus)

Crash

     - A high-pass filter at 700 Hz (red dot): the lower frequencies are useless with a Crash cymbal, as it's merely producing a high-pitched sound, like all cymbals.

     - a band at 9,87 KHz, with a volume of +3 dB and a width of 1 octave (orange dot). After scanning the frequencies, I found this one was the best choice for the Crash cymbal in my opinion.

     - The compressor part of the plugin is set with a threshold at -12 dB, a 4:1 ratio and a gain level of 3 dB. The attack is very short with 2 ms and the release value is 100 ms.

Plugin TrackPlug Ride
Ride TrackPlug plugin

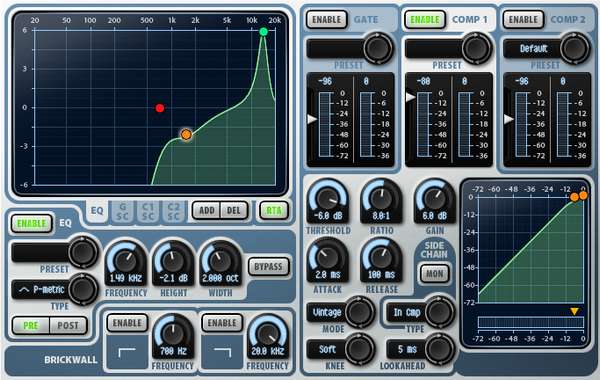
These are the settings of the TrackPlug plugin on the Ride bus:

Voici le son obtenu après l'ajout du plugin TrackPlug (bus "Charley", "Crash" et "Ride") et du plugin FinalPlug (bus "Cymbales")

Ride

     - A high-pass filter at 700 Hz (red dot): the lower frequencies are useless with a Ride cymbal, as it's merely producing a high-pitched sound, like all cymbals.

     - a band at 1,49 KHz, with a volume of -2 dB and a width of 2 octaves (orange dot). I found that this frequency was conflicting with other instruments, like guitars and vocals, so I dimmed it by 2 dB, not so much that it would negatively alter the sound of the Ride cymbal.

     - a band at 13,7 KHz, with a volume of +6 dB and a width of 0.5 octave (green dot). After scanning the frequencies, I found this one was the best choice for the Ride cymbal in my opinion.

     - The compressor part of the plugin is set with a threshold at -6 dB, an 8:1 ratio and a gain of 6 dB. The attack is very short with 2 ms and the release value is 100 ms.

Plugin FinalPlug
FinalPlug plugin

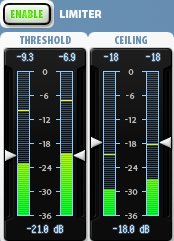
These are the settings of the FinalPlug plugin on the Cymbals bus:

     - The threshold is set on -21 dB, a low value because the cymbals' volume, especially the Hi-hat's is rather low, so I need to go get them low enough for the limiter to be effective.

     - The ceiling is set on -18 dB, 3 dB above the threshold. This is a weak compression, just enough to boost the sound a bit. In order to prevent the cymbals to sound too loud, the ceiling is set on a low value

     - The overall sound of the cymbals will be boosted further by the plugins from the Drums bus and the Master bus. The limiter triggering at -18 dB is therefore not an issue, even thought it may sound weak.
Top of page

OVERHEADS

The overheads are usually a pair of microphones placed above a drumkit to record the whole instrument, and particularly the cymbals. As we are using a virtual drum plugin, we are not using real microphones, but BFD can simulate overheads.

This is the sound of the overheads before processing


"Overhead" bus

On this bus, I added a parametric equalizer plugin called "TrackPlug" from Wave Arts, as well a limiter plugin called "FinalPlug", from the same company.
This is the sound obtained after using TrackPlug


Source: overheads audio track
Target: Drums bus
Volume: -9 dB
Panning: center

With a real drumkit recording, the overheads sound comes as a support for the other microphones and adds a touch of ambiant sound. As they are placed above the drumkit, they record not only the drum sounds themselves, but also the reverberation of the room, unlike the other microphones that are placed close to the kick drum, the snare drum, etc.
Such room reverberation is indeed simulated within our drums plugin. But as I'm adding a reverb plugin on the main Drums bus at the end of the chain in order to finalize the drums sound, I thus set the Overhead bus volume relatively low (-9 dB), so that it doesn't stand out too much. I removed a lot of lows, the overhead sound will merely bring some brightness to the drums sound.
Plugin TrackPlug
TrackPlug plugin

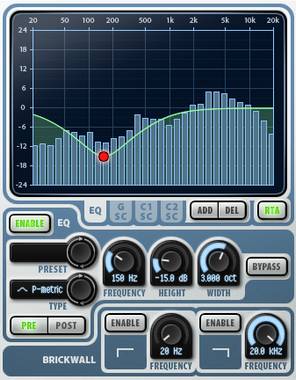
For the overheads, I set the EQ from TrackPlug like this:

     - A parametric band at 150 Hz, with a width of 3 octaves to get an impact in all low frequencies up to the low mediums, dipped a lot down to -15 dB.

     - I haven't completely removed the low frequencies but I lowered them quite a lot. Just listen how different the raw sound and the EQed sound are. As a consequence: the kick and snare drums sound very thin through the overheads, whereas the hi-hat is much more present.

     - No compression was used on this bus.
Top of page

DRUMS BUS

On this bus, the drums sound is complete (before mastering). I add a limiter with soft settings and a reverb effect. Therefore, it sounds more spacious and more pleasant to hear.

This is the sound of the kick drum with the effects of the Drums bus


*    *    *    *    *

This is the sound of the snare drum with the effects of the Drums bus
First the rimshot sound, then the normal hit sound


*    *    *    *    *

This is the sound of the cymbals with the effects of the Drums bus
Hi-hat


Crash cymbal


Ride cymbal


This is the sound of the overheads with the effects of the Drums bus


Source: Kick drum, snare drum, cymbals and Overhead buses
Target: Master bus
Volume : -4 dB
Panning: center

FinalPlug plugin
FinalPlug plugin

These are the settings used with the FinalPlug plugin on the Drums bus:

Final Plug is a commercial plugin, you will find free limiter plugins here, as well as a compressor plugin (that can be used as a limiter with the appropriate settings).
A limiter allows to boost the sound by setting a threshold level from which the sound will be raised up to a defined ceiling value.
     - Threshold is set on -2 dB. This is a small compression, just enough to boost the sound up to the level I wanted to reach, without having to modifiy the bus volume itself.

     - Ceiling is set on -0.1 dB.


Plugin Wizooverb
Wizooverb plugin

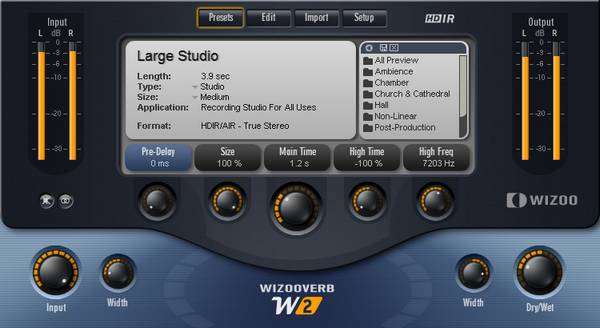
No need to go into the settings details, all reverb plugins offer different options. I'll simply define the general characteristics:

Wizooverb is a commercial plugin, but it is no longer sold, which is a pity because it's excellent. You will find free reverb plugins here. You can find a lot of alternatives on the Internet, with various levels of quality.
     - I chose a studio reverb. The Wet sound (the reverberated sound) is on 27%, so 73% comes from the Dry sound (original unaffected sound).

     - The reverb duration is 1.2 second.

     - There isn't any pre-delay (0 ms). Pre-delay is the time after which reverbs is triggered, after the sound has started playing. In the present case, the reverb starts immediately. The longer the pre-delay, the larger the venue seems to be (depending also on other factors such the Dry/Wet ratio, the room size parameter (if applicable), the reverb duration...). The shorter the pre-delay, the less you will hear the attack of the instrument, as it gets slightly drowned in the reverb. Here, the attack of a drum sound is the impact sound of the stick on the drum element. With a 30 or 40 ms pre-delay, the drum sounds would have been more percussive, as the reverb sound would trigger after the impact sound. I did this choice to smoothe the drums a bit.

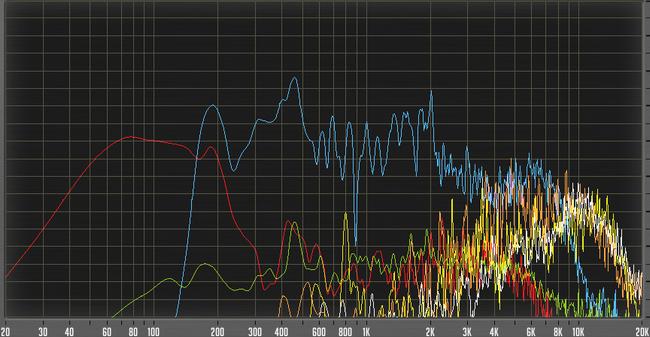
Fréquences de la batterie
Drums frequencies

Red - Kick drum
Blue - Snare drum
White - Hi-hat
Orange - Crash
Yellow - Ride
Green - Overheads

Of course, many of these frequencies seem to override in the highs, but these are cymbals and they don't play all at the same time.
Mixing in practice : Preparing the session | Bass | Drums | Rhythm guitars | Solo guitars | Keyboards | Vocals | Mastering
Top of page


MESSAGES

(leave a message)

Messages page # 1 2 3 4 5 6 7 8 9 10 11 12 13 14 15 16 17 18 19 20 21 22 23 24 25 26 27 28 29 30 31 32 33 34 35


aissa
le 27/01/2013 à 14h24

Bonjour,

Je suis chanteur de reggae et rappeur, j'aurais voulu connaître vos tarifs pour l'enregistrement de quelques titres à moi.

Je souhaiterais faire la prise de voix plus le mix.

Je suis habitué au studio. Faites-vous des tarifs à la journée ?

Cordialement.

* * * * * * * * * * * * * * * *

<em>Bonjour Aissa,

Merci de votre confiance, mais je ne suis pas un professionnel. Je n'ai pas de studio, simplement un home studio dans une pièce de mon appartement.
Je me contente de faire mes propres enregistrements, à l'occasion je bosse avec quelques potes pour leur filer un coup de main, mais ce n'est pas mon métier !
Et puis je n'ai jamais mixé de reggae ou de rap, alors je m'en voudrais de faire mal les choses dans un style que je ne maîtrise pas. Je vous conseille de vous tourner vers un studio pro spécialisé dans votre style, il doit être possible d'en trouver des pas trop chers.

Grebz</em>


Veji
le 22/01/2013 à 02h42

Which particular Redwirez impulses
1)which mic(sm57/r121/421 etc)
2)distance(0''/0.5''/1''/2'')
3)cap/cone capedge etc
are your favorites for distortion and clean?

Also do you use the bass with shb-1 w/impulses or without?

Thanks

* * * * * * * * * * * * * * * *

<em>Hello again Veji,

Concerning the SHB-1 bass amp sim, I find it very usable with and without impulses. Depends on the sound you want to get. The sound is brighter without impulses, deeper with impulses. It also depends on the tone you select on your bass when recording, on the settings you have in SHB-1 and on the impulse you pick.

I also sometimes don't use any amp sim for the bass track, leaving only the direct sound if it fits the song.

Or you can have one bass track with direct sound only, and a second bass track (a copy of the direct track) with an amp sim. Mixing the 2 can bring you the qualities of each, but it could also blur your bass sound. You need to try various possibilities and see (or hear) for yourself. Each song is different, so don't think you got it set once and for all. You probably need to make adjustments and try different combinations every time.

Now about the Redwirez impulses:
It's pretty damn difficult to tell you which impulses sound best. You probably won't use the same impulses if you play Metal songs or Rock'n Rollish songs. I am pretty sure that ACDC, Marilyn Manson, the Beatles, Oasis, Nirvana, Opeth, Metallica, Muse and Radiohead don't use the same gear.

It might be a good idea to try and find out what gear your favorite bands use and pick something similar, if that's their music genre you want to play.

As for me, I often use Vox AC30, because I love the Vox sound. That's my favorite.
But I also use Orange impulses, Engl Pro, Marshall 1960 as second choices.
Soldano, Bogner Uberkab and Mesa Rectifier from time to time.

For bass cabs, I try them all and change frequently. I don't have one favorite in particular. I have 4 impulse collections from Redwirez for bass: 2 Ampegs, Aquilar and Hartke cabs. They all have different qualities.

About the microphones and their positionning: most of the time, I use 2 impulses per guitar track.
My starting point is one R121 mic, CapEdge, 4'', and one SM57 mic, Cap, 0''. I found this combination to be pretty complementary, and it gives me a sound I'm immediately satisfied with. But it's not perfect every single time.
From that starting point, I will try to change the distances a bit until I find THE perfect combination (to my ears). Could be R121 at 2'' instead of 4, or CapOffAxis instead of Cap, etc.
It can be very time-consuming, it takes a bit of trials and errors, but if you want to reach your goal, that is to get THE sound you like, you have to go through this.

I also use my own impulses, particularly the Vox AC4 impulses, which sound pretty good, I'm proud :-)

Also note that the guitar you use will make a difference. My main guitar is a Fender Stratocaster, but a friend of mine lent me his Tokai Les Paul, and so my impulse settings need to be different, because these guitars sound different.

I also use Neumann U87 impulses, 421 or 414 mics... Really, I try a lot of things and it takes time.
Oh... and you have to try it in context. I mean, if you try various impulses while listening to your soloed guitar track, you will find a great sounding impulse combination, but when you play all the tracks together with all instruments, you will find that your combination doesn't sound so great anymore.

Have fun,

Grebz</em>


Chochel
le 20/01/2013 à 07h40

J'ai tenté L'UCG 102 Behringer + AC Box Combo soi-disant facile, résultat : pas un son... Énervé, j'ai découvert Studio de Grebz.

Ma question :
Est-ce que j'oublie l'UCG102 ?
Quel montage serait le plus aisé et le plus simple pour un premier essai ? Le combo Marshall ?

Par la suite, je tenterai des montages plus sophistiqués.

Cordialement,
JP


Veji
le 19/01/2013 à 15h50

Hi,
What are your top 5 best amp plugins and top 5 best cab impulses?
Also can you send me the recabinet 2... I can't find it anymore.
Thanks

* * * * * * * * * * * * * * * * *

<em>
Hi,

My favorite amp plugins for guitar are:
 - Ignite Amps' NRR1 (free product).
 - TSE's X50 (free product).
 - Kuassa's Amplifikation Creme (retail product), US$ 34. Only emulates one amp, but the sound you get is fantastic.
 - Overloud's TH2 (retail product), much more expensive - US$ 197 - but it emulates several real amps.

And for bass :
 - Ignite Amps' SHB1
 - Helian's 1st Bass or 2nd Bass (free products), which sound the same to me.

As for impulses, I use only Redwirez' impulses (retail products) which in my opinion are the ones that sound best of all the impulses I've tested so far. They're not free, but they're really unexpensive. The first cab impulses you buy will cost you US$9, then the more you buy, the more discount you get for the next impulses. And you can pick only the impulses you are interested in.

I cannot send you Recabinet's impulses, they are a discontinued retail product. They have been replaced by Recabinet 3, which cost only US$ 19.99 at the moment. That's quite a bargain, even though I think that Recabinet's impulses are not as good as Redwirez'. Your choice.

Finally, I am not sending any retail product to anyone. On my site, I make a large collection of free products available (amp sims, impulse loaders and impulses) for anyone to download, but I am not giving away any commercial products.

Cheers,
Grebz
</em>


Jak2112
le 08/01/2013 à 18h38

Salut !
Tout d'abord, félicitations et merci pour ce super site que je viens de découvrir et qui est très utile, notamment pour ceux qui débutent comme moi dans la MAO.
Donc en ce moment j'explore et je teste, mais j'ai un petit problème : je n'arrive pas à lire les extraits que vous proposez pour illustrer les différents plugins et logiciels ; le petit lecteur indique : Liste vide ! Peut-être ai-je oublié une manip en route ou autre ? Si vous pouviez m'aider ce serait super.
Merci d'avance et encore bravo !
Cordialement.
Jak2112

* * * * * * * * * * * * * * * *

<em>Bonjour, et merci !

En ce qui concerne le problème de lecture des extraits... il s'agit de lecteurs Flash, il peut donc y avoir des problèmes de compatibilité avec certains navigateurs.

De plus, si vous utilisez un système Apple, sachez qu'Apple a décidé (unilatéralement) de bannir Flash de ses machines, donc impossible de lire quoi que ce soit en Flash avec un iPad par exemple ou un iPhone. Pour les ordinateurs Mac, je ne sais pas trop, je n'ai pas eu l'occasion d'essayer, mais je crois avoir lu que c'était possible en téléchargeant le plugin Flash Player, comme sur PC. En ce qui concerne Linux, j'ai lu que seul le navigateur Chrome proposait la compatibilité Flash.

Entre parenthèses, il vaut mieux que vous soyez sur PC si vous comptez télécharger des choses sur mon site, parce que je ne propose que des plugins pour PC. Je suis moi-même utilisateur PC, donc je ne connais pas l'univers Mac ou Linux. Rien de sectaire, mais je suis un simple particulier, je ne peux pas m'occuper de tout, donc je m'occupe de ce que je connais uniquement ! Mais utiliser un Mac pour faire de la MAO est une excellente chose, aucun doute là-dessus. Après, tout est question de préférence et d'affinités. Fin de la parenthèse.

Si vous êtes sur PC avec Windows, il n'y a pas de raison que vous ne puissiez pas lire les extraits, à moins que votre navigateur Internet soit trop ancien, donc pas à jour ou incompatible, mais tous ceux que je connais fonctionnent bien. J'ai testé avec Internet Explorer, Chrome, Firefox, Opera et Safari, et mon site fonctionne bien avec chacun d'entre eux.

Ce que je vais faire, c'est essayer de proposer systématiquement de télécharger les extraits sonores en version mp3, ce qui permettra à tout le monde de pouvoir quand même les écouter même lorsque le lecteur Flash ne fonctionne pas. Il va me falloir un peu de temps pour mettre tout ça en place, mais je vais le faire rapidement, promis.

Grebz</em>

Top of page