Messages  |   Version française  |  


? | Home page | Simulators | Cabs and impulses | Create your own impulses

Homepage
Home page


CREATE YOUR OWN IMPULSES

STEPS

Why not create your own impulses? As you will see, the principle is very simple. Now, to create realistic-sounding impulses, it takes some trials and mistakes, it can be time-consuming, but it isn't difficult.

1 - Setting the D.A.W.
2 - Connecting the cables and microphone
3 - Setting the volume
4 - Recording what will become the impulse
5 - Exporting the recorded sound
6 - Finalizing the impulse
7 - Voilà!
8 - One step further
9 - Reverb impulses

MY IMPULSES

You can listen to samples I did with impulses I created myself. You may freely download and use these impulses at your convenience in your own musical creations.
This is what you'll need to create your impulses

- A "Test Tone" audio file, sweeping all frequencies from 20 Hz to 20 KHz, and lasting 3 to 12 seconds,

- A deconvolving software,

- At least one good microphone (the quality of the impulse depends greatly on the quality of the microphone),

- At least one cabinet, speaker, or any sound device you wish to create an impulse from,

- A recording software (any D.A.W. will do),

- An audio interface allowing to play and record simultaneously.

Haut de page

STEPS

GENERATING A TEST TONE

A Test Tone is an audio file sweeping all frequencies from 20 Hz to 20 KHz (from low to high). This is the sound we'll be playing through the device we want to make an impulse with.

This is what a 3-second Test Tone sounds like:

Warning: lower the volume, this sound is not pleasant!
First download and install this deconvolving software:

Voxengo Deconvolver (voxengo_deconvolver.zip, 324 KB).

This is the demo version (the full version costs 40 dollars and can be bought here if you wish). The demo only allows the creation of 3 impulses per session, and one impulse at a time, but all you need to do is close and re-open the software to create more impulses. So it isn't really bothering, unless you spend your days creating impulses...

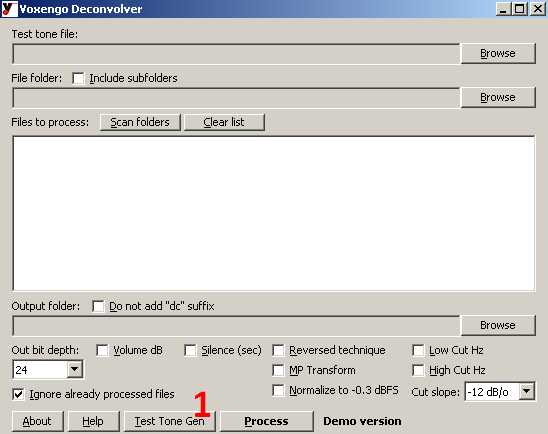
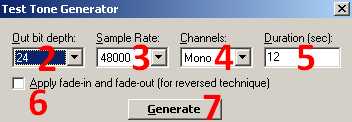
With Deconvolver, you can generate a Test Tone. Start Deconvolver, click on "Test Tone Gen" at the bottom (#1 on the screenshot), select the Out Bit Depth (2) and the Sample Rate (3) you usually use in your D.A.W., select Mono in Channels (4), leave the default duration on 12 seconds (5).

Note that after several tries, I didn't notice any difference in quality between the default 12-second Test Tone and a 3-second Test Tone. So now, I use 3-second Test Tones, which allows me to work faster and leave my neighbor's ears in peace... and mine!

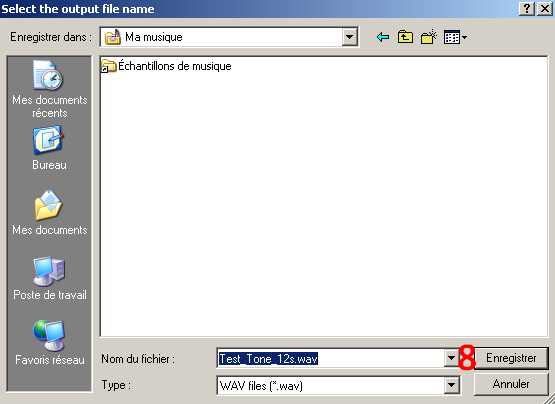
I unchecked the "Apply fade-in and fade-out..." box (6), but you can leave it checked if you wish. Finally, click on "Generate" (7) and choose the out-folder (8) for your Test Tone file. You will get a WAV file sweeping all frequencies from 20 Hz to 20 KHz. Not very musical, but very useful!
Deconvolver
Deconvolver
Deconvolver


Now that you have created a Test Tone, you can use it to record impulses.
In the following steps, we'll be using a mono Test Tone to create a mono impulse.

Download 4 Test Tones
(3 secondes, 44,1 et 48 KHz, 24 bits, mono and stereo, wav format) (Test_Tones.zip, 2,03 MB)
STEP 1

Open your D.A.W., create a mono audio track and place your brand new Test Tone file on it. Your recording will have to be slightly longer than the length of the Test Tone file. Create a second mono audio track. This is where you are going to record your take. You will then create as many mono tracks as you need for your takes.
STEP 2

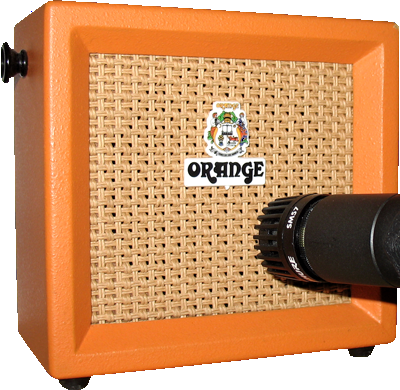
I connected a microphone in my audio interface. I connected the output #3 from the audio interface to the Input of my amplifier with a mono Jack cable (guitar jack), so that the Test Tone sound will go through the amplifier. I set the audio track with the Test Tone in such a way that the sound goes through the audio interface output #3. When I play the Test Tone, the sound thus goes out through the Orange Micro Crush. My microphone is connected to the Input #1 of my audio interface. The blank audio track is set to record sound from input #1, so it will record the sound from the microphone.
I placed the microphone in front of the amplifier. Where exactly? Well, you have to try various positions, depending on the amplifier, on the microphone, until you get a satisfying result. That is the hardest part: find a good positioning for the microphone. Considering the size of the Orange Micro Crush, I took the simplest option: dead center, very close to the grill.
STEP 3

Connections are ready, the microphone is in place... Now you have to test the sound volume. Be careful, Test Tones are pretty uncomfortable to listen to and can be pretty nasty for your ears, use ear protection, especially at high volume levels! If you do this in an appartment, do not do this at night, unless you hate your neighbors of course.
Play the Test Tone and:
    - Adjust the amplifier volume in order to have sufficient volume level to record,
    - Adjust the recording volume on the recording track. Your recording must not clip. Use the entry level of your audio interface and the amplifier volume button so that the record level does not go above -6 dB, and never ever above 0 dB in any case! It's best to vary the recording volume than raise the amplifier volume. Believe me, once you have heard a loud Test Tone, you'll never want to hear it again!
STEP 4

You're good? Levels checked? So start recording the Test Tone. Record all the Test Tone duration (3 seconds if that's the duration you chose), and most importantly: let the recording last longer than the Test Tone (one extra second is enough). Of course, you must not make any noise during the recording, in order to avoid recording any unwanted noise.
Now, export the recorded file in mono. Only export the recorded track. Mute the Test Tone track to avoid exporting it!
STEP 5

Open Deconvolver again. On top, in Test Tone File, click on Browse and get your Test Tone where you put it. Then click on the next Browse button in File Folder, and get the WAV file you exported and shortened in Step 5. Deconvolver will now compare your file and the Test Tone, and through complex mathematical convolution calculation, it will generate an impulse...
For the other options, check MP Transform, which is supposed to enhance the quality, although I am unable to tell you why. Check Normalize to -0.3 dBFS, which will automatically raise the volume of your impulse at a level of -0.3 dB.
Now click on Process at the bottom to start calculation. Depending on your computer, the calculation time will last more or less. It took less than 1 second in my case... pretty fast. Deconvolver adds the generated file in the same folder as your exported file. The file name is the same, with "_dc" (DeConvolver) added at the end. And we're almost finished.
STEP 6

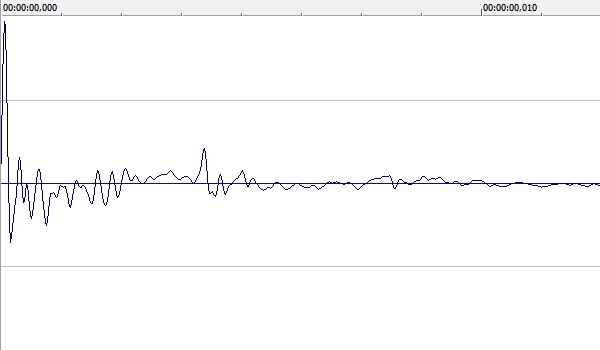
Retrieve your exported file and open it with any audio editor. You are going to delete the end of the file. As you should see, the generated file has a big curve at the beginning, then the rest of the curve is almost flat. There can be peaks farther in the waveform, due to the fact that the recorded file is longer than the Test Tone. These are interferences created during the deconvolving process, and you don't need those. The impulse does not need to be longer than 50 milliseconds (0.050 seconds)... That's very short. So the resulting file will be about 2 or 3 KB, sometimes a bit more, depending on the type of sound you want. Save your file without changing its attributes: if you had a mono 24 bit, 48 KHz file, you should keep it like that. Be careful however, some impulses need to be longer. Only cut the end of the waveform starting where it becomes flat, that is to say when its volume level is null. When recording impulses that have long reverb trails, you can get impulses that are much longer than 50 ms. Some impulses can last several seconds.
Impulsion
Here are the first 12 milliseconds of an impulse waveform. The rest is pretty much flat..
Voilà! That's your impulse. Rename the file to give it an explicit name. That will make it easier for you to know what it is when you have created many impulses.
For instance, a file name could be: Peavey - SM57 Edge 05 cm.wav.
This means: Peavey amplifier, SM57 microphone, position Edge, distance 5 cm between amp and mike.
If you share your impulses with other people, it will also be easier for other users to know what your impulses are.
ET VOILÀ !

Now you can test your impulse and see whether it meets your expectations... and create some more, with more microphones, various positionnings, other amplifiers. You can also create stereo impulses with two microphones, stereo audio tracks and a stereo Test Tone. Experiment!
ONE STEP FURTHER

That isn't all. We just saw how to create impulses reproducing the sound characteristics of a cabinet in order to simulate a recording with this particular cabinet. The same technique will allow you to reproduce the sound characteristics of a place! Imagine you wish to creat an impulse out of your living room, because you like the way this room sounds. It could be the acoustics of your bathroom, your garage, your car interior, or the rehearsal room of your band. It's all possible with the same method.

Of course, there are a few differences. First, it will be more interesting to create stereo impulses to simulate a real feeling of space. That means you will need two (identical) microphones, or make two takes if you have only one microphone, and make one mono track for each of the left and right takes. You can vary the feeling of space by changing the left/right panning of the two tracks.

Then instead of playing the Test Tone through a guitar cab as we did in the above example, you will have to play the Test Tone through speakers, which need to be as neutral as possible, like monitor speakers. Play the Test Tone at a volume that fits in the venue, place your microphones in the right spot to capture the atmosphere of the place. Of course, you don't have to content yourself with only one recording spot. For example, in any room, you can position your microphones right in the middle, or in opposite angles, place them face to face or facing opposite directions, near the speakers or far from them, etc. In each case, you will get different results, corresponding to different ways of perceiving a sound from various spots in one particular venue. You don't hear exactly the same thing if you lie down on the floor, position yourself in a corner or stand in the middle of a room. You decide where you want to capture the sound... try some spot that seems logical, or try to get various atmospheres out of one room.

In the end, you can use the impulses you created in any impulse loader and make it a reverb plugin, reproducing the sound characteristics of the venue you took the impulse from.

Venue impulses to download

More than 160 impulses from real or virtual venues, to use in an impulse loader:
Impulses for reverb (reverb_impulses.zip, 36.9 MB)

Haut de page

PERSONAL IMPULSES

For these demos, I used the NRR1 head amp simulator by Ignite Amps, and SIR Convolution as an impulse loader. The guitar is a Fender Stratocaster American Deluxe.

Vox AC4 TV - Orange Micro Crush CR3 - Roland Micro Cube - Peavey Ecoustic 110 EFX


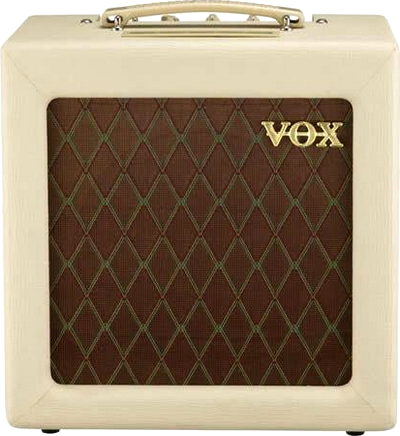
Vox AC4 TV

Vox AC4TV

This small Vox tube amp delivers a vintage sound. Excellent for clean tones and good old bluesy crunch. Perfect for Rock or Blues.
10-inch speaker, 4W power, about 9 kg (20lbs), a Tone knob, a Volume knob, a 4W/1W/¼W selector and that's it. The louder you play, the crunchier the sound gets.
4W only? It doesn't sound like much and you can read that it's ideal to take advantage of this amp at home, without disturbing the neighbors. Well... even at ¼W power, the sound level is impressive! You won't crank up the volume all the way up, because that will be super loud! But the sound is great, a very distinctive Vox sound. The impulses I created out of the AC4 will faithfully reproduce that distinctive British sound.


Download: Vox AC4TV Impulses
(14 impulses - impulses_vox_ac4tv_grebz.zip, 381 KB)


Orange Micro Crush CR3

Orange Micro Crush & Shure SM57

Miniature solid state 3W amplifier, 15 cm (6 in) high, with a 4-inch speaker, light-weight 800 g (about 1lb 12oz), works on battery or off the mains (transformer not included!), headset plug, overdrive knob, that's a mini-amp you can take with you anywhere. Of course, the sound is somewhat shrill, there are almost no low tones, but the Tone knob can help improve things a bit. The impulses I created are a pretty close simulation of this distinctive sound. You won't make an album out of this, but it can add a touch of originality.


Download: Orange Micro Crush Impulses
(12 impulses - impulses_orange_micro_crush_grebz.zip, 403 KB)


Roland Micro Cube

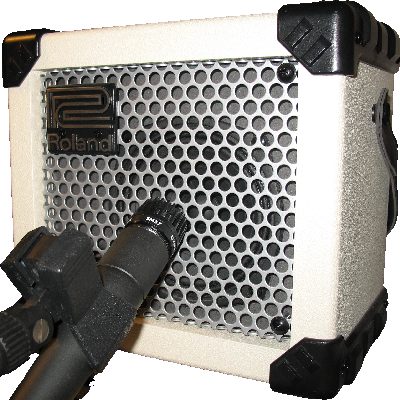
Roland Micro Cube & Shure SM57

This is another small amplifier, bigger than the Orange Micro Crush. The manufacturer is Roland and this amp can also work on battery or off the mains (6 AAA batteries for about 20 hours). You can add a shoulder strap and take it out with you to play in the street if you like. This is a solid state amplifier with included amp simulation, reverb, delay and a few other effects are included, it's a 2 watt amplifier (but it can get loud), 5-inch speaker, 3.3 kg (7lb 4oz), headset plug... all you need to play without making the neighbors crazy and yet...
Watch this YouTube demo, and this one, from the same guy. It could make you want to buy a Micro Cube!


Download: Roland Micro Cube Impulses
(40 impulses - impulses_roland_micro_cube_grebz.zip, 902 KB)


Peavey Ecoustic 110 EFX

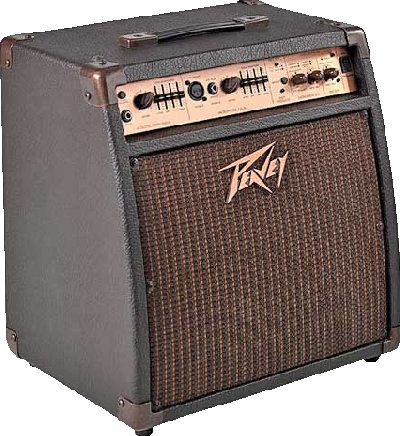
Peavey Ecoustic 110 EFX

This solid state Peavey amp was made for electro-acoustic guitars. It also works fine with vocals, violin or harmonica.
10-inch speaker, bi-amplified with 30W for lows and 10W for highs, with reverb, chorus, delay effects and more.
The next sample was made with a 6-string electro-acoustic guitar and a 12-string electro-acoustic guitar. I used the Ignite Amps' NRR1 and Poulin's Lextac amp sims.


Download: Peavey Ecoustic 110 EFX Impulses
(64 impulses - impulses_peavey_ecoustic_110efx_grebz.zip, 421 KB)

Haut de page


MESSAGES

(leave a message)

Messages page # 1 2 3 4 5 6 7 8 9 10 11 12 13 14 15 16 17 18 19 20 21 22 23 24 25 26 27 28 29 30 31 32 33 34 35


Only
le 19/01/2011 à 21h18

Je suis en République Démocratique du Congo,dans la capitale Kinshasa. Je voudrais monter un home studio avec une bonne qualité de son. Je veux savoir comment installer le matériel, quelle est la disposition. C'est possible de monter un home studio avec un budget de 5000 euros ?

* * * * * * * * * * * * * * * *
<em>Je ne connais pas les tarifs au Congo, mais avec 5000 euros, tu peux déjà te faire plaisir. Après, tout dépend de ce que tu cherches. Si tu n'as rien du tout et que tu veux te faire un local avec isolation sonore, acheter un ordinateur, des logiciels et puis des instruments de musique, c'est pas sûr que ce soit suffisant.

Mais si c'est simplement pour acheter un ordinateur, une interface audio, un micro, un préampli et des enceintes de monitoring, alors oui, 5000 euros suffisent.

Un conseil : il faut que les élements cités ci-dessus soient homogènes dans la chaîne sonore. Inutile d'acheter un super micro très cher pour l'associer à un préampli bas de gamme. Tout doit être dans la même gamme de qualité (ce qui ne veut pas forcément dire dans la même gamme de prix !).

Pour plus de détails, parce que je ne peux pas répondre à tous sur chaque problème particulier, et que ce n'est pas le but de mon site, je vous conseille le site <a href="http://fr.audiofanzine.com/" target="_blanck">Audiofanzine</a>, qui est très complet et dont le forum est une mine d'informations inépuisable.

Grebz</em>


jeff2902
le 19/01/2011 à 19h51

Bonjour,

Je voudrais pouvoir obtenir un son proche de celui de groupes de pop-punk tel que <a href="http://www.youtube.com/watch?v=GcNiKCmWdYE" target="_blanck">All time Low</a> par exemple, un son assez propre.

J'utilise déjà Guitar Rig 4 et Amplitube mais les sons ne me conviennnent pas. J'ai essayé plusieurs amplis Lepou, mais impossible d'obtenir un son propre. Pourriez vous m'aider svp ? Je vous remercie d'avance.

PS : le MySpace du <a href="http://myspace.com/nastyshades" target="_blanck">groupe dans lequel je joue</a>.

* * * * * * * * * * * * * * * *

<em>D'après ce que j'entends, il y a un gros travail d'égalisation pour éviter les recoupements de fréquence, ce qui permet de bien séparer les sonorités des guitares. Je pense aussi qu'ils ont au minimum doublé les prises de guitare pour faire un effet "mur du son". Il y a des guitares partout qui jouent plus ou moins la même chose, on n'a pas un instant de repos.

La caisse claire est très en avant, de même que la voix lead. Juste après, on a les guitares, la basse est plutôt en retrait (en même temps, le bassiste ne fait pas grand-chose d'intéressant, il se contente de suivre les accords) et les cymbales sont assez discrètes aussi.

Il semblerait que le groupe All Time Low utilise des amplis et baffles Mesa, des simus de chez Line 6, et qu'ils font aussi appel à des simulateurs d'amplis et de baffles (comme moi !).

Fais des essais avec des simulations Nick Crow, le NRR1 d'Ignite Amps ou le Lecto de Lepou, en ajoutant un simulateur de baffle avec des impulsions de baffle MESA (je crois qu'il y en a dans celles que je propose).

Grebz</em>


Pioud
le 02/01/2011 à 12h16

Hello Grebz,

Super ton tuto sur la convolution ! Très intéressant !
Merci pour toutes ces informations !
Je vois peut être un axe d'amélioration afin d'obtenir une convolution de bonne qualité :
Lorsque tu relies la sortie de ton interface audio à ton ampli guitare, tu as un problème d'impédance qui n'est pas respecté : il faut je pense utiliser une boite de reamp (inverse d'une DI) afin d'adapter l'impédance.
Voilà, bonne continuation et bonne année !!!

PJ

* * * * * * * * * * * * * * * *

<em>Alors là, je n'en sais rien du tout. Dans les différents tutoriaux que j'ai pu lire ou voir en vidéo (en anglais dans la plupart des cas, c'est pour ça que j'ai décidé d'en faire un en français), je n'ai jamais rien vu qui concerne l'impédance. Ce qui ne veut pas dire que le problème ne se présente pas, d'ailleurs.
Mais je dois dire que je n'ai rien constaté de gênant lors de la création de mes impulsions. N'ayant pas de boîte de reamp, je ne vais pas pouvoir essayer, mais que ceux qui suivent le tuto n'hésitent pas à essayer d'en ajouter une dans la chaîne, histoire de vérifier que ça améliore les choses. Et si c'est le cas, tant mieux ! Tout ce qui peut contribuer à améliorer les techniques est le bienvenu.

Et bonne année à tous, bien entendu ! Bonheur, bonne bouffe et teint hâlé !

Grebz</em>


Brughes
le 27/12/2010 à 11h43

J'ai composé un morceau rythmique. Si cela t'intéresse, je te l'envoie.

* * * * * * * * * * * * * * * *

<em>Si vous avez des morceaux, indiquez-moi plutôt un lien où les écouter (myspace, jamendo ou autre...)

Grebz</em>


LaurentB
le 24/12/2010 à 11h41

Bonjour,

J'essaie Sonar X1 depuis quelques jours et je le trouve super, sauf un problème que je n'arrive pas à résoudre : voir mes plugins VST !

J'ai bien entendu précisé le chemin de mes plugins (program files\vstplugins)et la quasi-totalité de mes VST n'est pas visible quand je veux affecter un effet audio à une piste.

J'ai pourtant l'habitude de faire fonctionner des VST dans FL Studio ou Reaper.
Le plus bizarre, c'est que mis à part un ou deux rejetés, Sonar semble les voir lors du scan : je ne comprends pas.

Si vous pouvez m'aider, ça serait sympa.

Merci pour votre site et les impulsions d'ampli à télécharger.

* * * * * * * * * * * * * * * *

<em>Si vous utilisez un Sonar 64 bits sur un Windows 64 bits également, il ne faut pas oublier que Windows gère 2 dossiers Program Files différents. Le premier s'appelle "Program Files (x86)" et contient tous les programmes 32 bits. Le second s'appelle "Programmes" (dans la version française, et "Program Files" dans la version anglaise) et contient tous les programmes 64 bits.

Il est tout à fait possible de placer manuellement ses plugins dans l'un ou l'autre des répertoires, mais bien entendu, il faut indiquer à Sonar d'aller chercher dans les deux.

Dans mon cas, mes VST 32 bits sont dans ce répertoire-là :
C:\Program Files (x86)\Cakewalk\Vstplugins
Et mes VST 64 bits sont là :
C:\Programmes\Cakewalk\Vstplugins

Certains VST sont fournis avec un programme d'installation. Il ne faut pas simplement les placer manuellement dans le bon répertoire VST, ils vont s'installer eux-mêmes dans un répertoire spécifique, à moins bien sûr de choisir le répertoire VST lors de l'installation.

Par exemple, le simulateur d'ampli TH1 de Overloud s'installe par défaut dans le répertoire C:\Programmes\Overloud
Il n'est donc pas dans un répertoire VST. Pour que Sonar le voit (j'imagine que c'est pareil dans un autre séquenceur), il faut ajouter ce chemin dans le gestionnaire de plugins de Sonar, sinon il sera introuvable dans la liste des VST disponibles.

Grebz</em>

Haut de page