Version française


? | Home page | Tutorial | Mixing in practice | Bass

Homepage
Home page


BASS

Reminder: we work on this song I wrote: Life


I recorded my bassby plugging it directly in a preamp, connected to my audio interface. I don't use a real amplifier and a microphone to record the instrument, like you would in a professional recording studio. Why not? Because I don't have any bass amplifier... As we are about to see, I use an amp simulator and an impulse loader instead. Advantages: you can play at a reasonable sound volume, or with headphones, without disturbing anyone, and you can edit the recorded sound at a later time by changing simulators and effects, without having to re-record anything. Drawback: it may not sound as warm, as realistic as a live recording. But we are in a home studio situation, with all the constraints that go with it (noise, room for the gear, cost of the gear...). Furthermore, even professional studios often record bass directly through consoles.

Here is the list of the plugins I used for the bass part:
        * Tube Saturator from Wave Arts, a tube saturation simulation
        * NoAmp from Mokafix, a free amp simulator for guitar and bass, with a hot sound
        * LeCab 2 from Poulin, a free impulse loader for my cabinet impulses
        * WizooVerb from Wizoo, a reverb plugin
        * TrackPlug from Wave Arts, a parametric equalizer
In the case of retail plugins, I will tell you which free plugins you can use to replace them.

In Life, the bass comes in rather late (around 2'59''). That's a deliberate choice, to add some thickness to the end of the song.

Track 1: raw bass - Track 2: saturated bass - Bass bus

There are two bass audio tracks. The audio of the second track is a copy-pasted version of the audio in the first track. What's the point? This allows me to produce two complementary bass sounds by applying different processings on each track.
The first track is the raw sound of the bass, as directly recorded.
The second track have various plugins to obtain a slightly saturated sound.

Both tracks are routed towards the Bass bus

Top of page

RAW BASS TRACK

Mono audio track
Volume: 0 dB
Panning: center
This is the raw bass sound


No plugin is used to modify the raw bass. It is sent to the main Bass bus where it blends with the saturated bass sound coming from the other bass track.

Top of page

SATURATED BASS TRACK

Tube saturation - Amp head simulator - Impulse loader

Mono audio track
Volume: 0 dB
Panning: center
The plugins are used in this order: tube saturation, amplifier head simulator, impulse loader.
Note that I don't use reverb with the bass. I think it tends to make the bass sound sort of blurry. Of course, it's a question of taste, and it also depends on the song. Here, the instrumentation is rich enough, with guitars, keyboards, vocals and drums, and there isn't enough room for reverb on the bass.
I will also use some EQ on the Bass bus. Thus the equalization will be the same for both raw and saturated bass tracks.

Saturation

This is the bass sound processed with a tube saturation plugin


At this stage, the sound is merely that of a bass recorded directly with some saturation. It still needs to go through an amplifier!

The purpose here is to obtain the same effect as if a real tube saturation device was used with a real amplifier head.

Settings used with the plugin Tube Saturator from Wave Arts:

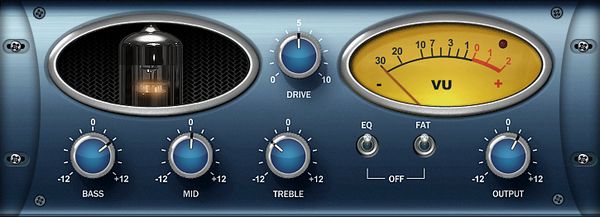
     - "Bass" is set on 2 o'clock in order to boost low frequencies a bit, "Mid" remains centered, "Treble" is on 10 o'clock to slightly decrease the amount of high frequencies, "Drive" is centered, so it brings some saturation but not too much, "EQ" is activated (or else, the "Bass, "Mid" and "Treble" buttons would not work), and so is "Fat". "Fat" raises the level of saturation when activated. Lastly, "Output" is set on 1 o'clock. That's the output level, and I set it so the maximum level obtained doesn't go over 0 dB.

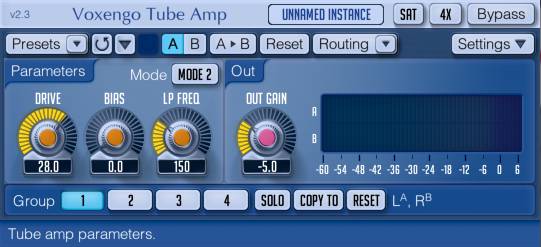
     - This plugin is a commercial product, and you can replace it by Tube Amp, a free plugin from Voxengo, which can bring the same kind of tube saturation. The settings are different, but you can achieve similar results.

Plugin Tube Saturator
Tube Saturator plugin
Plugin Tube Amp
Tube Amp plugin

Amplifier head simulator

This is the sound of the bass goign through a saturation and an amp head simulator


Like with real gear, the sound now needs to go through a cabinet.

To complete the sound of this amp sim, we are going to add an impulse loader.

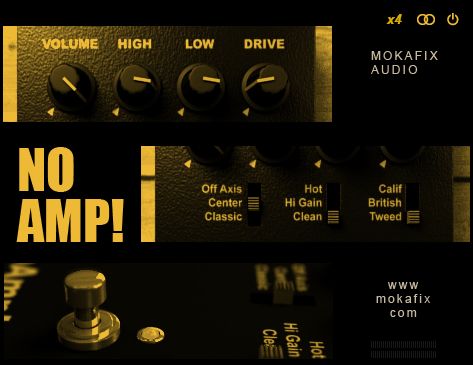
Settings used with the plugin NoAmp from Mokafix:

     - This is a free plugin. You can download it here.

     - The settings are visible in the screenshot below.

Plugin NoAmp
NoAmp plugin

Impulse loader

This is the sound of the bass going through a saturation an amp head sim and a simulated cabinet


Settings used with the plugin LeCab 2 from Poulin:

     - LeCab 2 is a free impulse loader plugin from Poulin. Impulses are "sound prints" from real cabinets. It allows to load up to 6 impulses simultaneously. I only used two impulses for the bass, that's why the screenshot below only shows 2 of the 6 available slots.

     - LeCab 2 offers various parameters you can set with each impulse slot. I set the volume to 1 (the maximum value), panning is centered, low-pas filter is set on 6 KHz to cut all irrelevant high frequencies. The other settings remain on their default value

     - I used impulses from RedWirez, a collection of high quality commercial impulses. Here, I used impulses from the cabinets Aguilar DB115, a 1x15" speaker cabinet (the real gear costs about 1000 euros and weighs 39 kg!). The first impulse is recorded at the center of the speaker with an Earthworks TC30 microphone placed against the cabinet cloth. The second impulse is recorded with a Shure Beta 52 microphone facing the edge of the speaker cone at a distance of 12" (about 30 cm). The first microphone puts the saturation forward, and the second one gives a warmer, rounder, less saturated sound. Blending the two sounds results in the sound you can here in the demo. If you want to load free impulses, you can find some on this page of my site,but they're not really sorted... You will have to look for the impulses you may find interesting, or look for others on the Internet.

Plugin LeCab 2
LeCab 2 plugin
As there is no reverb for this bass, the saturated sound is now complete. We now need to assemble the sound of both Bass tracks on the Bass bus.

Top of page

BASS BUS

This is the sound of the bass processed with saturation, amplifier head and a cabinet, before equalization


And after equalization


The sound of the bass is now ready. It will only be edited some more during the Mastering stage.

This is where both bass tracks are converging. The sound of the bass on this bus is final (before Mastering).
I add a TrackPlug plugin from Wave Arts, to eq the bass sound.

Volume: -6 dB
Panoramique: center

TrackPlug is a commercial product. You will find free equalizers here. I advise you to use Cocks ReaEQ.
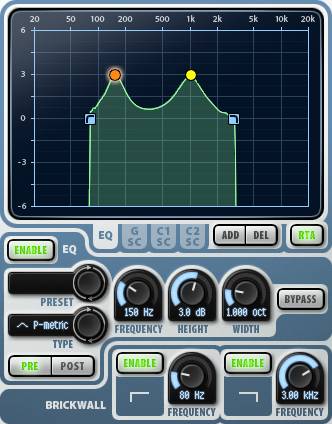
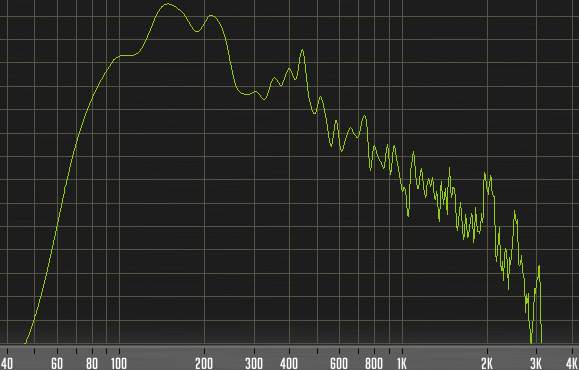
     - The plugin TrackPlug is used to equalize the bass sound. The sound will not change completely. A syou can see on the screenshot below, I edited the following parameters:

     - A brickwall is applied to both high and low frequencies. I cut all frequencies below 80 Hz and all frequencies above 3 KHz. This will decrease the bass range and prevent to conflict with the bass synth called Saw Bass in low frequencies (this synth is boosted by 2 dB at 60 Hz). It will not interfere either with the guitars and voices in high mediums. Yet, it won't alter the bass, as you can perfectly recognize it's a slightly saturated bass.

     - I added a +3 dB point at 150 Hz (orange point), and another one at 971 Hz (yellow point) by +3 dB in order to boost these two frequencies that help the bass to stand out in the mix. There's no magic, I just swept through all frequencies while playing the song in order to find what frequencies bore the sound I was looking for, and chose those two.

     - Usually, bass sound is compressed to make it denser and stand out. I did not find it useful for this song. First, I think that the saturation I used compresses it enough already, and second, the bass is loud enough as it is. Compressing it further wouldn't have been necessary as the very low frequencies are taken care of by the Saw Bass synth.

Plugin TrackPlug
TrackPlug plugin
Fréquences de la basse
Bass frequencies
Mixing in practice : Preparing the session | Bass | Drums | Rhythm guitars | Solo guitars | Keyboards | Vocals | Mastering
Top of page


MESSAGES

(laisser un message)

Page de messages n° 1 2 3 4 5 6 7 8 9 10 11 12 13 14 15 16 17 18 19 20 21 22 23 24 25 26 27 28 29 30 31 32 33 34 35


Em
le 30/07/2013 à 15h51

Hello from the Philippines,
I like your site about home studio recording, the articles are very helpful for me, though I still don't have a song project (Busy at work) I'm looking forward to using what I have learned from your tutorial.
Thanks

* * * * * * * * * * * * * * * *

<em>
Wow! Nice to know that readers from the other side of the planet read my website!

I hope you can start recording your own songs soon. Enjoy!

Grebz</em>


jjchampbulle
le 30/07/2013 à 15h12

Un grand merci pour la clarté de vos explications. Je suis débutant en MAO et vos commentaires sont bienvenus au moment où je dois remplacer mon matériel informatique.

* * * * * * * * * * * * * *

<em>Content de pouvoir vous aider, et bienvenue dans le monde de la MAO !

Grebz</em>


Gratteux41
le 19/05/2013 à 12h27

Bonjour, j'ai téléchargé AcmeBarGig Brain 2, mais c'est juste un fichier .dll ?!
Je ne comprends pas comment m'en servir... ;)

Merci

* * * * * * * * * * * * * * * *

<em>
Bonjour et bienvenue sur mon site.

En effet, tous les simulateurs proposés sont au format VST pour Windows. Ce ne sont donc pas des logiciels indépendants, il faut obligatoirement les utiliser au sein d'un séquenceur, ou de n'importe quel logiciel permettant d'utiliser des VST.

Certains existent également pour Mac, mais il faudra aller les chercher vous-même sur le site de l'éditeur (j'en donne toujours le lien lorsqu'il existe), car étant utilisateur PC, je ne peux pas vérifier et tester les versions Mac. Or, je me suis fixé de ne proposer au téléchargement que des choses que je peux moi-même utiliser, vérifier.

Sinon, pour utiliser ces fichiers dll, la méthode est donnée ici : <a href="http://www.grebz.fr/simulator.php#howto">Comment utiliser les plugins de simulation d'ampli dans un séquenceur</a>.

Grebz</em>


knophe
le 22/04/2013 à 01h09

Je trouve le site super ! Et c'est encore plus super quand il y a ce que l'on cherche et gratuit !!! Merci encore du partage!!


wil85
le 29/01/2013 à 17h22

Bonjour,

Merci pour les conseils sur votre site, pour un débutant comme moi c'est parfait.
Par contre, quels seraient les réglages à effectuer sur les toms (EQ, compression, etc)

Merci

* * * * * * * * * * * * * * * *

<em>Bonjour,

Merci de votre visite sur mon site.
Pour les toms, voici les réglages par défaut que j’utilise.
Je précise que je me sers aujourd'hui du logiciel de batterie Fxpansion BFD2 pour composer mes batteries.

Mes réglages par défaut sont adaptés à mes goûts et aux toms que j’utilise. Si j’avais choisi d’autres toms, mes réglages auraient été différents, bien entendu. Ils ne vous conviendront donc peut-être pas, mais cela vous fera une base de travail.

Tom floor : Tamburo Opera Floor Tom
Tom mid : Ludwig Vistalite
Tom high : DW

<strong>Réglages Tom floor :</strong>
EQ :
Brickwall à 60Hz (coupure nette de toute fréquence inférieure)
+6dB à 82Hz
+2dB à 282Hz
-4dB à 1,5KHz
+1,7dB à 6,12KHz
Hi-shelf de -6dB à 14,8KHz

Compression :
Threshold à -18dB
Ratio 12:1
Attack 15ms
Release 60ms
Gain 3dB

<strong>Réglages Tom mid:</strong>
EQ :
Brickwall à 60Hz (coupure nette de toute fréquence inférieure)
+3dB à 104Hz
-2,5dB à 530Hz
+2dB à 950Hz
-3,7dB à 2,12KHz

Compression :
Threshold à -18dB
Ratio 8:1
Attack 15ms
Release 60ms
Gain 3,6dB

<strong>Réglages Tom floor :</strong>
EQ :
Brickwall à 80Hz (coupure nette de toute fréquence inférieure)
-9dB à 139Hz
+2dB à 835Hz
-3dB à 2,66KHz
+3dB à 7,9KHz

Compression :
Threshold à -18dB
Ratio 8:1
Attack 15ms
Release 60ms
Gain 5dB

À moduler en fonction de vos goûts, et surtout à adapter en fonction de la chanson. Il n’existe pas de réglages qui conviennent pour tout. Les hausses et baisses de fréquences doivent être ajustées en fonction des autres instruments pour éviter de masquer ou au contraire d’amplifier certaines fréquences. Ça se fait à l’oreille, dans le contexte de la chanson, avec la musique qui joue.

Bon courage !

Grebz</em>

Top of page