Version française


? | Home page | Tutorial | Mixing in practice | Bass

Homepage
Home page


BASS

Reminder: we work on this song I wrote: Life


I recorded my bassby plugging it directly in a preamp, connected to my audio interface. I don't use a real amplifier and a microphone to record the instrument, like you would in a professional recording studio. Why not? Because I don't have any bass amplifier... As we are about to see, I use an amp simulator and an impulse loader instead. Advantages: you can play at a reasonable sound volume, or with headphones, without disturbing anyone, and you can edit the recorded sound at a later time by changing simulators and effects, without having to re-record anything. Drawback: it may not sound as warm, as realistic as a live recording. But we are in a home studio situation, with all the constraints that go with it (noise, room for the gear, cost of the gear...). Furthermore, even professional studios often record bass directly through consoles.

Here is the list of the plugins I used for the bass part:
        * Tube Saturator from Wave Arts, a tube saturation simulation
        * NoAmp from Mokafix, a free amp simulator for guitar and bass, with a hot sound
        * LeCab 2 from Poulin, a free impulse loader for my cabinet impulses
        * WizooVerb from Wizoo, a reverb plugin
        * TrackPlug from Wave Arts, a parametric equalizer
In the case of retail plugins, I will tell you which free plugins you can use to replace them.

In Life, the bass comes in rather late (around 2'59''). That's a deliberate choice, to add some thickness to the end of the song.

Track 1: raw bass - Track 2: saturated bass - Bass bus

There are two bass audio tracks. The audio of the second track is a copy-pasted version of the audio in the first track. What's the point? This allows me to produce two complementary bass sounds by applying different processings on each track.
The first track is the raw sound of the bass, as directly recorded.
The second track have various plugins to obtain a slightly saturated sound.

Both tracks are routed towards the Bass bus

Top of page

RAW BASS TRACK

Mono audio track
Volume: 0 dB
Panning: center
This is the raw bass sound


No plugin is used to modify the raw bass. It is sent to the main Bass bus where it blends with the saturated bass sound coming from the other bass track.

Top of page

SATURATED BASS TRACK

Tube saturation - Amp head simulator - Impulse loader

Mono audio track
Volume: 0 dB
Panning: center
The plugins are used in this order: tube saturation, amplifier head simulator, impulse loader.
Note that I don't use reverb with the bass. I think it tends to make the bass sound sort of blurry. Of course, it's a question of taste, and it also depends on the song. Here, the instrumentation is rich enough, with guitars, keyboards, vocals and drums, and there isn't enough room for reverb on the bass.
I will also use some EQ on the Bass bus. Thus the equalization will be the same for both raw and saturated bass tracks.

Saturation

This is the bass sound processed with a tube saturation plugin


At this stage, the sound is merely that of a bass recorded directly with some saturation. It still needs to go through an amplifier!

The purpose here is to obtain the same effect as if a real tube saturation device was used with a real amplifier head.

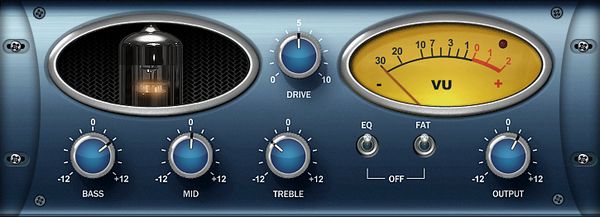
Settings used with the plugin Tube Saturator from Wave Arts:

     - "Bass" is set on 2 o'clock in order to boost low frequencies a bit, "Mid" remains centered, "Treble" is on 10 o'clock to slightly decrease the amount of high frequencies, "Drive" is centered, so it brings some saturation but not too much, "EQ" is activated (or else, the "Bass, "Mid" and "Treble" buttons would not work), and so is "Fat". "Fat" raises the level of saturation when activated. Lastly, "Output" is set on 1 o'clock. That's the output level, and I set it so the maximum level obtained doesn't go over 0 dB.

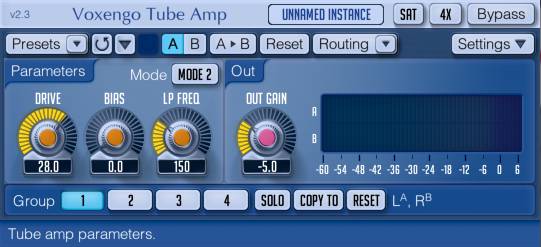
     - This plugin is a commercial product, and you can replace it by Tube Amp, a free plugin from Voxengo, which can bring the same kind of tube saturation. The settings are different, but you can achieve similar results.

Plugin Tube Saturator
Tube Saturator plugin
Plugin Tube Amp
Tube Amp plugin

Amplifier head simulator

This is the sound of the bass goign through a saturation and an amp head simulator


Like with real gear, the sound now needs to go through a cabinet.

To complete the sound of this amp sim, we are going to add an impulse loader.

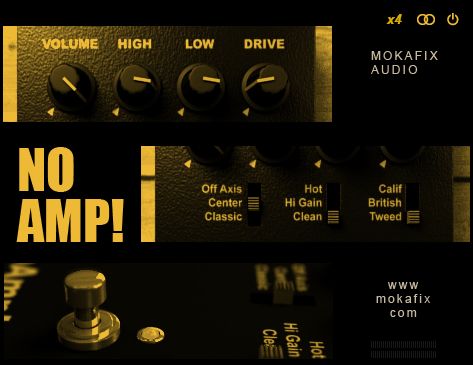
Settings used with the plugin NoAmp from Mokafix:

     - This is a free plugin. You can download it here.

     - The settings are visible in the screenshot below.

Plugin NoAmp
NoAmp plugin

Impulse loader

This is the sound of the bass going through a saturation an amp head sim and a simulated cabinet


Settings used with the plugin LeCab 2 from Poulin:

     - LeCab 2 is a free impulse loader plugin from Poulin. Impulses are "sound prints" from real cabinets. It allows to load up to 6 impulses simultaneously. I only used two impulses for the bass, that's why the screenshot below only shows 2 of the 6 available slots.

     - LeCab 2 offers various parameters you can set with each impulse slot. I set the volume to 1 (the maximum value), panning is centered, low-pas filter is set on 6 KHz to cut all irrelevant high frequencies. The other settings remain on their default value

     - I used impulses from RedWirez, a collection of high quality commercial impulses. Here, I used impulses from the cabinets Aguilar DB115, a 1x15" speaker cabinet (the real gear costs about 1000 euros and weighs 39 kg!). The first impulse is recorded at the center of the speaker with an Earthworks TC30 microphone placed against the cabinet cloth. The second impulse is recorded with a Shure Beta 52 microphone facing the edge of the speaker cone at a distance of 12" (about 30 cm). The first microphone puts the saturation forward, and the second one gives a warmer, rounder, less saturated sound. Blending the two sounds results in the sound you can here in the demo. If you want to load free impulses, you can find some on this page of my site,but they're not really sorted... You will have to look for the impulses you may find interesting, or look for others on the Internet.

Plugin LeCab 2
LeCab 2 plugin
As there is no reverb for this bass, the saturated sound is now complete. We now need to assemble the sound of both Bass tracks on the Bass bus.

Top of page

BASS BUS

This is the sound of the bass processed with saturation, amplifier head and a cabinet, before equalization


And after equalization


The sound of the bass is now ready. It will only be edited some more during the Mastering stage.

This is where both bass tracks are converging. The sound of the bass on this bus is final (before Mastering).
I add a TrackPlug plugin from Wave Arts, to eq the bass sound.

Volume: -6 dB
Panoramique: center

TrackPlug is a commercial product. You will find free equalizers here. I advise you to use Cocks ReaEQ.
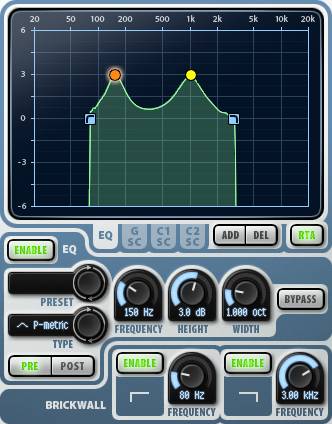
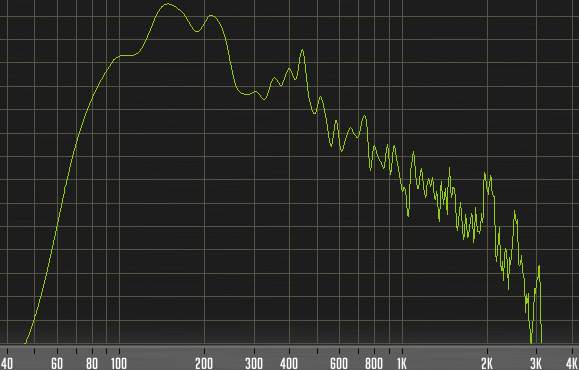
     - The plugin TrackPlug is used to equalize the bass sound. The sound will not change completely. A syou can see on the screenshot below, I edited the following parameters:

     - A brickwall is applied to both high and low frequencies. I cut all frequencies below 80 Hz and all frequencies above 3 KHz. This will decrease the bass range and prevent to conflict with the bass synth called Saw Bass in low frequencies (this synth is boosted by 2 dB at 60 Hz). It will not interfere either with the guitars and voices in high mediums. Yet, it won't alter the bass, as you can perfectly recognize it's a slightly saturated bass.

     - I added a +3 dB point at 150 Hz (orange point), and another one at 971 Hz (yellow point) by +3 dB in order to boost these two frequencies that help the bass to stand out in the mix. There's no magic, I just swept through all frequencies while playing the song in order to find what frequencies bore the sound I was looking for, and chose those two.

     - Usually, bass sound is compressed to make it denser and stand out. I did not find it useful for this song. First, I think that the saturation I used compresses it enough already, and second, the bass is loud enough as it is. Compressing it further wouldn't have been necessary as the very low frequencies are taken care of by the Saw Bass synth.

Plugin TrackPlug
TrackPlug plugin
Fréquences de la basse
Bass frequencies
Mixing in practice : Preparing the session | Bass | Drums | Rhythm guitars | Solo guitars | Keyboards | Vocals | Mastering
Top of page


MESSAGES

(laisser un message)

Page de messages n° 1 2 3 4 5 6 7 8 9 10 11 12 13 14 15 16 17 18 19 20 21 22 23 24 25 26 27 28 29 30 31 32 33 34 35


hammer-on
le 08/04/2011 à 23h10

D'abord merci de partager tes connaissances.

Une question dans ce monde de Rock, existe-t-il des simulateurs et baffles plus dédiés pour les sons clairs, exemple le Jazz Chorus 120 de Roland (style Pat Metheny, Larry Carlton, Carlos Santana).

* * * * * * * * * * * * * * * *

<em>Bonjour,

Content que mon site te soit utile !
En ce qui concerne des simulateurs de têtes ou de baffles qui soient bons en sons clairs, beaucoup des têtes dont je parle ici, que ce soit les simus payantes ou gratuites, proposent plusieurs canaux, comme les vraies têtes. On trouve souvent un canal clair et un ou deux canaux pour la disto. C'est vrai que le canal clair produit souvent un son un peu crunchy s'il est réglé à un volume trop élevé. Pour garder un son vraiment clair, une utilisation du canal clean à un volume moyen, associé à un baffle de bonne qualité (Orange, Soldano, Fender) devrait faire l'affaire.

Les amplis typés Metal donnent en général de beaux sons clairs, mais peut-être un peu froids, tandis que les amplis rock vintage auront tendance à cruncher plus vite mais auront ce petit grain chaleureux en plus.
Dans les amplis gratuits, j'aime énormément le NRR1 de Ignite Amps, très polyvalent. Son canal clair, associé à un baffle Orange par exemple est à mon goût très réussi.
Le Fender Twin de SimulAnalog, gratuit également, est assez ancien mais très réussi et il inclut son propre baffle. C'est une reproduction fidèle (je trouve) du modèle original.
Le Lextac de Lepou est capable de faire de beaux sons clairs également, associé au bon baffle.
Dans les payants, je suis tombé amoureux du Amplifikation Creme de Kuassa. Il n'est pas cher (34 dollars) et il a une palette de sonorités assez vaste. Il inclut même son propre simulateur de baffle qu'on peut bypasser si l'on veut pour utiliser un simulateur de baffle externe. Peut-être pas le meilleur pour les sons vraiment clairs, toutefois.

Après, il y a les Guitar Rig, Amplitube ou mieux encore TH1 (TH2 maintenant) ou Peavey Revalver MK3 qui proposent un nombre impressionnant d'amplis divers et variés, et on peut y trouver de tout, du son clair au Metal le plus extrême, mais c'est pas donné.

Je vais pas être très original, mais le meilleur conseil que je puisse donner, c'est... d'essayer. Il ne faut pas hésiter à prendre un ampli et tourner les boutons dans tous les sens, essayer diverses associations d'amplis et de baffles. Personne ne peut savoir le son que tu as en tête, LE son que tu cherches exactement. Ça prend du temps, moi je n'ai pas non plus toujours le temps ou simplement la patience de prendre 2 heures ou plus à fignoler un son précis, et pourtant, c'est le meilleur moyen d'y arriver.
Les recettes miracle, déjà toutes prêtes, ça n'existe pas.
Bon courage !

Grebz</em>


NickiRage
le 23/02/2011 à 20h39

Salut Grebz !

Je voulais juste savoir, je voudrais vraiment me rapprocher le plus possible du son des Avenged Sevenfold ! Donc je voudrais savoir quel ampli, cabinet etc... et les réglages si tu as le temps bien sûr :)

Je te remercie pour tout le travail que tu fais et tout ce que tu m'as apporté !!

NickiRage

* * * * * * * * * * * * * * * *

<em>Bonjour,

Voilà ce que j'ai pu trouver sur le matos du groupe, mais en ce qui concerne les réglages, je ne vais pas trop pouvoir t'aider :
<a href="http://www.uberproaudio.com/who-plays-what/188-avenged-sevenfold-synyster-gates-guitar-gear-rig-and-equipment" target="_blank">Matériel de Avenged Sevenfold</a>
Surtout qu'ils utilisent non seulement des amplis (bien sûr !) mais aussi pas mal de pédales pour modifier le son. Dans quel ordre et avec quels réglages, c'est dur à dire et j'imagine que ça dépend des chansons. Ils n'ont probablement pas UN seul réglage pour toutes les chansons.

Grebz</em>


Gigi
le 05/02/2011 à 10h14

Bonjour,

Bravo pour ce site qui est clair, sympa et rassurant !

Je suis en train d'installer (moi aussi) un home studio...Novice, j'ai regardé vos recommandations pour l'installation... Je viens d'acheter un Neumann... Bon, maintenant, je suis coincée, car j'ai acheté la Harley des micros, sans avoir bien pensé à son garage, son essence, etc...

Bref, après ce gros achat, je ne sais pas quel ampli et quelle interface audio acheter le moins cher possible (d'occasion sur E-Bay il y a de bonnes affaires)... Mais quelles marques choisir ?

Je peux encore investir, mais le budget est devenu serré...

J'ai lu des tonnes de pages de forum, mais aucun cas n'est comme le mien... qui est aussi bête que moi me direz-vous ? (j'ai le 103 TLM)

Sinon, bonne continuation et vive la Musique !

Gigi

* * * * * * * * * * * * * * * *

<em>
Effectivement, investir dans un Neumann, c'est bien, mais il faut assurer derrière pour garder la cohérence de la chaîne audio. En interface audio, je dirai que les marques RME ou MOTU sont hautement recommandables, on trouve aussi du bon matériel chez M-Audio, Presonus ou Edirol.
(voir cette page sur <a href="http://fr.audiofanzine.com/carte-son-externe/" target="_blank">Audiofanzine</a>)

Pour ce qui est des préamplis, PreSonus propose des préamplis à lampe pas trop chers (modèles BlueTube ou TubePre). Après, les prix peuvent monter en flèche avec d'autres marques comme SPL ou Avalon.
(voir cette page sur Audiofanzine pour les <a href="http://fr.audiofanzine.com/preampli-lampes/" target="_blank">préamplis à lampe</a>, et celle-ci pour les <a href="http://fr.audiofanzine.com/preampli-transistors/" target="_blank">préamplis à transistor</a>)

Grebz</em>

* * * * * * * * * * * * * * * *

Merci de vos conseils, c'est vraiment gentil...
Votre site est vraiment indispensable et je vais suivre vos recommandations pour l'installation. Vous au moins, vous vous exprimez avec un langage clair et donc accessible aux néophytes.

Bonne continuation et vive la Musique !


SolartNow
le 02/02/2011 à 21h01

Bravo pour ce site, c'est du super job, sérieux, pédagogique, intelligent, méthodique, pratique, efficace, compétent, que des "complimentations" révérencieuses...

Je suis conquis Mr Grebz, mes meilleurs voeux pour vos projets... et puisque "qui donne reçoit"... J'espère que tu vas recevoir (ce que tu espères bien sûr !)

Signé un modeste MusicoBricolo : <a href="http://solartnow.c.la/" target="_blanck">SolartNow</a>.


M.M.
le 27/01/2011 à 01h42

Avec quel type de préampli dois-je utiliser un micro royer r121 pour l'optimiser au mieux ?
Ma liste de préamplis : Universal Audio 2610 et (6176), TL Audio vc1, SPL Chanel one, Presonus Digimax.
Merci d'avance.

* * * * * * * * * * * * * * * *

<em>Désolé, je n'en sais rien. Pour des questions sur du matériel spécifique, voyez sur les forums du site <a href="http://fr.audiofanzine.com/" target="_blanck">Audiofanzine</a>. Il y aura soit la réponse à vos questions, soit quelqu'un qui saura.

Pour ma part, je me contente de parler du matériel et des logiciels que je connais et que j'utilise chez moi, dans mon home studio. Pour le reste, ça sort de ma compétence.

Grebz</em>

* * * * * * * * * * * * * * * *

Merci quand même ! Sympa ton site..

Top of page