

? | Home page | Tutorial | Recording


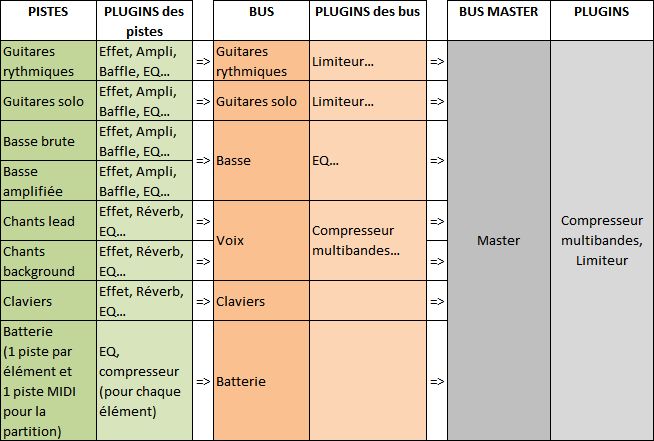
Before anything else, we need to prepare the recording session. We are not going to look for a melody, nor improvise or rehearse... we are going to properly record a song that we have already written. To avoid doing the same things over again each time I wish to record a song, I prepared a blank template which contains all the tracks and buses I need. I may naturally add or delete some elements if the template is not appropriate for the current project.
What does my template look like?
Track-wise:
- Rhythm guitar tracks (from 2 to 8 depending on the project)
- Solo guitar tracks (usually 2 tracks to make the sound thicker)
- Two bass tracks (one with the direct raw sound, and one with an amp simulation)
- Lead vocal tracks (usually one or two tracks, depends if I record it twice or not)
- Background vocals tracks (if the project demands it)
- Keyboard tracks (same thing, the number of virtual instruments will depend on the project, can be none, can be 5 or 6...)
Then we have drum tracks. There is one track per drum element. They are automatically created when I insert my virtual drum plugin:
- Kick drum
- Snare drum
- Low tom
- Medium tom
- High tom
- Hi-hat
- Crash cymbal
- Ride cymbal
- Splash cymbal
- Overhead microphone
- Room Ambiance microphone
- Piezzo microphone
- One MIDI track on which the drum score will be placed.
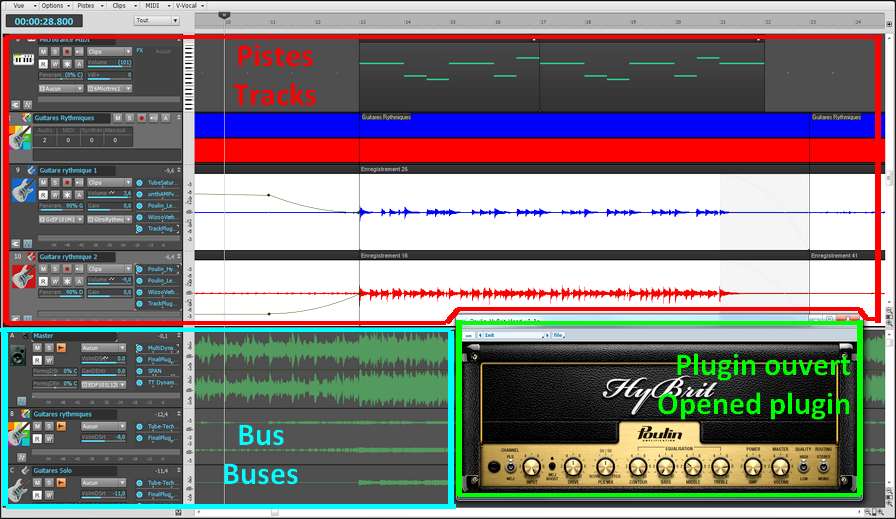
Bus-wise, I have one group for the guitars, one for the bass, one for the vocals, one for the drums, each of them is redirected towards the Master bus, which goes out throuh my studio monitors. It looks like this:





Recording an acoustic real drum kit is far from being easy, even for professional sound engineers. It a time-consuming process, it's frequent to spend several hours placing the microphones around the drum elements before you can actually record. But we are in a home studio, and we will have to deal with a software drum kit, based on midi files...
First of all, why start with the drums? The answer is simple, we will use drums as a metronome. The drums sound will guide us and help us follow the tempo. This will allow for an even recording and the song will not speed up or slow down unintentionally. Of course, variations can be interesting and bring some life to an otherwise mechanical tempo, but let's consider that a studio session seeks recording perfection, even though it's only a home studio.
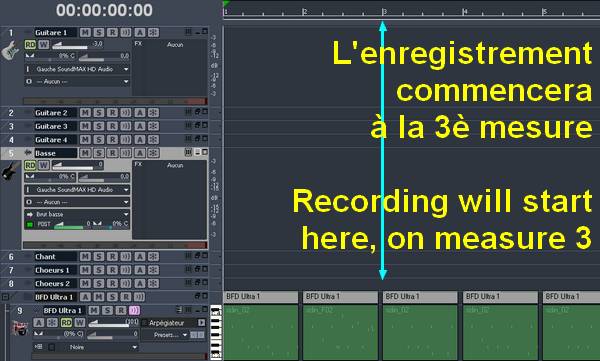
I usually have no idea what my final drum track will sound like. Actually, I only adjust it when the rest of the song is finished. But I still need its metronome function to record all other instruments. Thus, I create a drum track which repeats itself over and over again, and I try to have this loop match what I am about to play (no punk rhythm to record a ballad). For instance, I'll use one of these patterns:

Let's not forget we are recording in a home studio, in an appartment and it is simply impossible to play with a good old 100-watt tube amplifier, without the neigbors calling the police. So we are going to have to record the guitars and the bass directly through the audio interface. No real amplifier, no microphones involved. The latter solution would be preferable, but on of the benefits of direct recording, coupled with amplifier simulators, is that you can always edit the sound later, without having to re-record. Just change the settings and you're done.
So now... bass or guitars first? There isn't one clear answer. Bass and drums are the foundation, the rhythm base of a song and everything else should rely on them. But other factors could also be taken into consideration: for instance, the person recording may be more comfortable with a guitar than a bass, and will rather play guitar first. Or maybe the song has a very important bass riff that compels you to record it first. In any case, you are the one who can decide. If you are uncertain, then the drum / bass duo is a safe bet. If this is in place, then the rest can easily be added.
Guitar or bass, the recording process will be the same. Plug your guitar into the pre-amp, the pre-amp is connected to the audio interface (or plug your guitar directly into the audio interface if using the interface's pre-amp), and set the recording level. This is very important! Before recording anything, check that you are not going to go beyond the maximum level (0 dB, zero decibel). In a home studio, you won't have a sound engineer besides you to make adjustments on the fly, while you are playing. You are the one to take precautions. How can you do that? Simple: try and adjust, it doesn't take long and will prevent you from making a perfect take, then realize the levels were too low or too high, forcing you to do it all over again.
Have a try: for a rhythm guitar for example, play the loudest parts and set the preamp and audio interface volume levels in such way that when you play the loudest, the recording level doesn't go beyond -6 dB. The absolute maximum that you should not reach or go beyond is zero dB. If you play in your try the same way you play during the actual recording, then you can be certain the recording level will be correct. If your average level is between -9 db and -6 dB, then your level is sufficient and you have a margin of error before clipping.
Clipping is the term used to indicate that you reach or go beyond 0 dB. Clipping is your enemy :-)
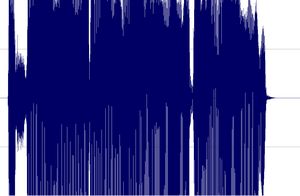
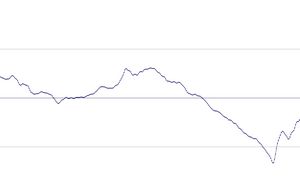
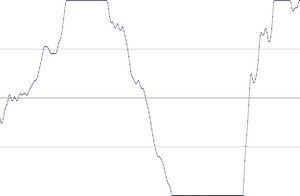

I prefer to record them last but there are no rules. If you prefer to record them first, then do so.
To record vocals, make sure the place is quiet, shut the door, tell the people who live with you to be quiet, and do not record while your neighbor is drilling holes through his kitchen walls! Also, turn off your monitors and use a headset instead to avoid recording the playback with your microphone.
Condenser or dynamic microphones?
Dynamic microphones are solid, they don' need a power source, they can take heavy acoustic pressure (like a kick drum or a saxophone) and they are not too expensive. They are also less sensitive to surrounding noises than condenser microphones. The cons are they lack clarity in the high range, which renders takes less clear and defined than with condenser microphones. They can be used with Jack or XLR plugs.
Condenser microphones are much more responsive and accurate. Their high sensitivity is double-edged, because they will capture any noise when recording. The fans of your PC are noisy? Chances are this noise will be recorded. Sound comes out of your headset? It will be recorded by your condenser microphone. Children are loudly playing outside? You might get that too. However, some condenser microphones are called "cardioid", or "hyper cardioid", and they only record what comes from a specific direction, ignoring (more or less) other sound sources from other directions. On the contrary, omnidirectional microphones record what comes from anywhere. Not ideal for a home studio. Condenser microphones are also more fragile (don't knock them) and must be powered through a "phantom power", whose standard is 48 volts. This kind of power is either present on your audio interface and can be turned on and off with a button, or it will require the use of an external phantom power source that you will then connect to your audio interface. You have to use 3-pin XLR plugs that carry the phantom power current. Finally, condenser microphones are usually rather expensive, some of them cost several thousand euros (or dollars, or pounds), but only professional studios or rich amateurs can afford those. On the plus side, the sound you get with a condenser microphone will have the best quality.
Be cautious though, a good dynamic microphone is worth better than a bad condenser microphone. No big secret here, for microphones like for anything else, very low prices are rarely synonymous with good quality.
A few known and renowned microphone brands: AKG, Milab, Neumann, Rode, Sennheiser, Shure...
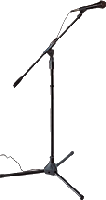
Some pieces of advice: buy a microphone stand and a pop filter (you can also make one yourself with wire and a piece of tights from your wife / girlfriend / mother / daughter / neighbor). The stand will prevent you from manually holding your microphone and thus produce handling noises. As for the pop filter, it prevents the air to hit the microphone and produce unwanted blowing sounds when you pronounce some letters such as "p" or "b".
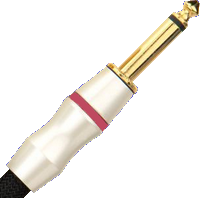
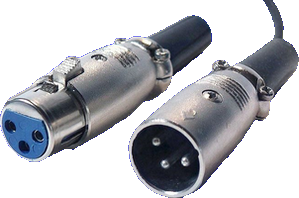
Jack plug (left) and XLR (right)


No need to go on and on forever, recording is rather easy. As long as you pay attention to your recording levels and take care over your takes, you should get a satisfying result, good enough to finalize the song

Messages page # 1 2 3 4 5 6 7 8 9 10 11 12 13 14 15 16 17 18 19 20 21 22 23 24 25 26 27 28 29 30 31 32 33 34 35

aissa
le 27/01/2013 à 14h24
Bonjour,
Je suis chanteur de reggae et rappeur, j'aurais voulu connaître vos tarifs pour l'enregistrement de quelques titres à moi.
Je souhaiterais faire la prise de voix plus le mix.
Je suis habitué au studio. Faites-vous des tarifs à la journée ?
Cordialement.
* * * * * * * * * * * * * * * *
<em>Bonjour Aissa,
Merci de votre confiance, mais je ne suis pas un professionnel. Je n'ai pas de studio, simplement un home studio dans une pièce de mon appartement.
Je me contente de faire mes propres enregistrements, à l'occasion je bosse avec quelques potes pour leur filer un coup de main, mais ce n'est pas mon métier !
Et puis je n'ai jamais mixé de reggae ou de rap, alors je m'en voudrais de faire mal les choses dans un style que je ne maîtrise pas. Je vous conseille de vous tourner vers un studio pro spécialisé dans votre style, il doit être possible d'en trouver des pas trop chers.
Grebz</em>

Veji
le 22/01/2013 à 02h42
Which particular Redwirez impulses
1)which mic(sm57/r121/421 etc)
2)distance(0''/0.5''/1''/2'')
3)cap/cone capedge etc
are your favorites for distortion and clean?
Also do you use the bass with shb-1 w/impulses or without?
Thanks
* * * * * * * * * * * * * * * *
<em>Hello again Veji,
Concerning the SHB-1 bass amp sim, I find it very usable with and without impulses. Depends on the sound you want to get. The sound is brighter without impulses, deeper with impulses. It also depends on the tone you select on your bass when recording, on the settings you have in SHB-1 and on the impulse you pick.
I also sometimes don't use any amp sim for the bass track, leaving only the direct sound if it fits the song.
Or you can have one bass track with direct sound only, and a second bass track (a copy of the direct track) with an amp sim. Mixing the 2 can bring you the qualities of each, but it could also blur your bass sound. You need to try various possibilities and see (or hear) for yourself. Each song is different, so don't think you got it set once and for all. You probably need to make adjustments and try different combinations every time.
Now about the Redwirez impulses:
It's pretty damn difficult to tell you which impulses sound best. You probably won't use the same impulses if you play Metal songs or Rock'n Rollish songs. I am pretty sure that ACDC, Marilyn Manson, the Beatles, Oasis, Nirvana, Opeth, Metallica, Muse and Radiohead don't use the same gear.
It might be a good idea to try and find out what gear your favorite bands use and pick something similar, if that's their music genre you want to play.
As for me, I often use Vox AC30, because I love the Vox sound. That's my favorite.
But I also use Orange impulses, Engl Pro, Marshall 1960 as second choices.
Soldano, Bogner Uberkab and Mesa Rectifier from time to time.
For bass cabs, I try them all and change frequently. I don't have one favorite in particular. I have 4 impulse collections from Redwirez for bass: 2 Ampegs, Aquilar and Hartke cabs. They all have different qualities.
About the microphones and their positionning: most of the time, I use 2 impulses per guitar track.
My starting point is one R121 mic, CapEdge, 4'', and one SM57 mic, Cap, 0''. I found this combination to be pretty complementary, and it gives me a sound I'm immediately satisfied with. But it's not perfect every single time.
From that starting point, I will try to change the distances a bit until I find THE perfect combination (to my ears). Could be R121 at 2'' instead of 4, or CapOffAxis instead of Cap, etc.
It can be very time-consuming, it takes a bit of trials and errors, but if you want to reach your goal, that is to get THE sound you like, you have to go through this.
I also use my own impulses, particularly the Vox AC4 impulses, which sound pretty good, I'm proud :-)
Also note that the guitar you use will make a difference. My main guitar is a Fender Stratocaster, but a friend of mine lent me his Tokai Les Paul, and so my impulse settings need to be different, because these guitars sound different.
I also use Neumann U87 impulses, 421 or 414 mics... Really, I try a lot of things and it takes time.
Oh... and you have to try it in context. I mean, if you try various impulses while listening to your soloed guitar track, you will find a great sounding impulse combination, but when you play all the tracks together with all instruments, you will find that your combination doesn't sound so great anymore.
Have fun,
Grebz</em>

Chochel
le 20/01/2013 à 07h40
J'ai tenté L'UCG 102 Behringer + AC Box Combo soi-disant facile, résultat : pas un son... Énervé, j'ai découvert Studio de Grebz.
Ma question :
Est-ce que j'oublie l'UCG102 ?
Quel montage serait le plus aisé et le plus simple pour un premier essai ? Le combo Marshall ?
Par la suite, je tenterai des montages plus sophistiqués.
Cordialement,
JP

Veji
le 19/01/2013 à 15h50
Hi,
What are your top 5 best amp plugins and top 5 best cab impulses?
Also can you send me the recabinet 2... I can't find it anymore.
Thanks
* * * * * * * * * * * * * * * * *
<em>
Hi,
My favorite amp plugins for guitar are:
- Ignite Amps' NRR1 (free product).
- TSE's X50 (free product).
- Kuassa's Amplifikation Creme (retail product), US$ 34. Only emulates one amp, but the sound you get is fantastic.
- Overloud's TH2 (retail product), much more expensive - US$ 197 - but it emulates several real amps.
And for bass :
- Ignite Amps' SHB1
- Helian's 1st Bass or 2nd Bass (free products), which sound the same to me.
As for impulses, I use only Redwirez' impulses (retail products) which in my opinion are the ones that sound best of all the impulses I've tested so far. They're not free, but they're really unexpensive. The first cab impulses you buy will cost you US$9, then the more you buy, the more discount you get for the next impulses. And you can pick only the impulses you are interested in.
I cannot send you Recabinet's impulses, they are a discontinued retail product. They have been replaced by Recabinet 3, which cost only US$ 19.99 at the moment. That's quite a bargain, even though I think that Recabinet's impulses are not as good as Redwirez'. Your choice.
Finally, I am not sending any retail product to anyone. On my site, I make a large collection of free products available (amp sims, impulse loaders and impulses) for anyone to download, but I am not giving away any commercial products.
Cheers,
Grebz
</em>

Jak2112
le 08/01/2013 à 18h38
Salut !
Tout d'abord, félicitations et merci pour ce super site que je viens de découvrir et qui est très utile, notamment pour ceux qui débutent comme moi dans la MAO.
Donc en ce moment j'explore et je teste, mais j'ai un petit problème : je n'arrive pas à lire les extraits que vous proposez pour illustrer les différents plugins et logiciels ; le petit lecteur indique : Liste vide ! Peut-être ai-je oublié une manip en route ou autre ? Si vous pouviez m'aider ce serait super.
Merci d'avance et encore bravo !
Cordialement.
Jak2112
* * * * * * * * * * * * * * * *
<em>Bonjour, et merci !
En ce qui concerne le problème de lecture des extraits... il s'agit de lecteurs Flash, il peut donc y avoir des problèmes de compatibilité avec certains navigateurs.
De plus, si vous utilisez un système Apple, sachez qu'Apple a décidé (unilatéralement) de bannir Flash de ses machines, donc impossible de lire quoi que ce soit en Flash avec un iPad par exemple ou un iPhone. Pour les ordinateurs Mac, je ne sais pas trop, je n'ai pas eu l'occasion d'essayer, mais je crois avoir lu que c'était possible en téléchargeant le plugin Flash Player, comme sur PC. En ce qui concerne Linux, j'ai lu que seul le navigateur Chrome proposait la compatibilité Flash.
Entre parenthèses, il vaut mieux que vous soyez sur PC si vous comptez télécharger des choses sur mon site, parce que je ne propose que des plugins pour PC. Je suis moi-même utilisateur PC, donc je ne connais pas l'univers Mac ou Linux. Rien de sectaire, mais je suis un simple particulier, je ne peux pas m'occuper de tout, donc je m'occupe de ce que je connais uniquement ! Mais utiliser un Mac pour faire de la MAO est une excellente chose, aucun doute là-dessus. Après, tout est question de préférence et d'affinités. Fin de la parenthèse.
Si vous êtes sur PC avec Windows, il n'y a pas de raison que vous ne puissiez pas lire les extraits, à moins que votre navigateur Internet soit trop ancien, donc pas à jour ou incompatible, mais tous ceux que je connais fonctionnent bien. J'ai testé avec Internet Explorer, Chrome, Firefox, Opera et Safari, et mon site fonctionne bien avec chacun d'entre eux.
Ce que je vais faire, c'est essayer de proposer systématiquement de télécharger les extraits sonores en version mp3, ce qui permettra à tout le monde de pouvoir quand même les écouter même lorsque le lecteur Flash ne fonctionne pas. Il va me falloir un peu de temps pour mettre tout ça en place, mais je vais le faire rapidement, promis.
Grebz</em>
